Les articles publiés sur le site
-
How to publish your plugin or theme on the Piwik Marketplace – Introducing the Piwik Platform
This is the next post of our blog series where we introduce the capabilities of the Piwik platform. Over the last weeks we have already introduced you to some of the basics on how to create plugins and themes. This time you’ll learn how to publish a plugin or theme on the Piwik Marketplace to share it with all Piwik users.
What is the Piwik Marketplace?
The Marketplace is a showcase for all plugins and themes that can be used in Piwik. You can browse them either on a standalone website or in Piwik itself by going to Settings => Marketplace. There you can install and update them with just one click. Easy as that! While some of those plugins are provided by Piwik or Piwik PRO most of them are created and maintained by our community. Everyone is very welcome to distribute plugins or themes on the Marketplace.
Prerequisites
To publish your plugin on the Marketplace you simply need to meet these requirements:
- The plugin name is not already taken by another plugin
- The code of the plugin is hosted in a public GitHub repository
- The GitHub service “Piwik plugins” for this repository is enabled (Repository Settings => Webhooks & Services => Add Service)
- Push permission for this repository
- The plugin is free (as in not paid)
- The license must be compatible with the GNU General Public License v3 or any later version
There is also list of Rules for plugins.
Best practices
Before actually distributing your plugin we recommend to follow a couple of best practices to make sure your plugin looks good on the Marketplace and provides useful information for your future users. If you have used the console to generate a plugin the needed files were already created for you.
Provide a good description
Make sure there is a file named
README.mdin the root of your plugin. When preparing your plugin for the Marketplace we will search for four sections in this file: Description, FAQ, Changelog and Support. Each of those is optional but it is good practice to provide at least a section Description and Support by prefixing them with##. Any content of your readme outside of those sections will not be displayed on the Marketplace.# Piwik Plugin Name ## Description Add your plugin description here. ## Support Please direct any feedback to hello@piwik.org. If you experience any issues feel free to file an issue at https://github.com/piwik/piwik/issues .A good example can be seen in the README.md of the CustomAlerts plugin and the related CustomAlerts plugin page.
Provide screenshots
This will improve your appearance in the Marketplace a lot and users will be more likely install your plugin. It is as easy as placing “png” or “jpg” files in a folder named
screenshots. The filename of each image will be shown in the UI with underscores replaced by a whitespace. This way you can provide a nice description. Have a look at the CustomAlerts plugin to see how it works.Provide contact details
Your contact details are specified in the
plugin.jsonfile of your plugin root folder. Providing at least one author and a link to your homepage is required. If you do not have a website you can use a link to your GitHub profile. This helps your users contact you in case they want to thank you for your great work or if they have any problem with it. An example plugin.json looks like this:{ "name": "MyPluginName", "homepage": "http://piwik.org", "authors": [ { "name": "Piwik", "email": "hello@piwik.org", "homepage": "http://piwik.org" } ], "support": { "email": "hello@piwik.org", "issues": "https://github.com/piwik/piwik/issues", "forum": "http://forum.piwik.org", "wiki": "https://github.com/piwik/piwik/wiki", "irc": "#piwik-dev" } }Choose a license
Choosing the right license that works best for you and your users is important. To distribute a plugin via the Piwik Marketplace the license must be compatible with the GNU General Public License v3 or any later version. If you do not specify a license anywhere in your plugin, it is assumed your plugin uses GPLv3 or later. The license must be specified in the
plugin.jsonfile using the propertylicense:{ "name": "MyPluginName", "license": "GPL v3+" }Provide donation links
You can define a donation link or email for PayPal, Flattr and Bitcoin in the
plugin.jsonfile. Users that love your work will then be able to donate you money directly from the plugin page.{ "name": "MyPluginName" "donate": { "paypal": "sponsor@piwik.org", "flattr": "https://flattr.com/profile/piwik", "bitcoin": "1234567890" } }How to publish the first version of your plugin
We are trying to make it as easy as possible for you to publish your plugin on the Marketplace. That’s why we don’t require any logins or packaging. To publish your plugin you only have to create a new tag of your plugin and within a minute your plugin will be ready to be installed on hundreds of thousands of Piwik installations.
To tag your plugin you can use one of the following two suggestions:
Using the command line
git tag 0.1.0 && git push --tagsWhere “0.1.0” is the name of the tag. While you can use any tag name it is best practice to use the current version number as defined in the
plugin.jsonfile.Using GitHub UI
To tag a new version via GitHub click on Releases => Draft a new release.

Now you can enter a tag name (version) and press “Publish release” as shown in this screen. That’s it!

How to provide an update for your plugin
To provide an update you only have to increase the version number in the file
plugin.jsonand create another tag as explained in the previous section. Your new Plugin update will be visible on the Marketplace within a minute or so. It might take a bit longer until the update appears in Piwik itself as each Piwik server only checks for updates every few hours.For a complete list of information go to our Distributing Your Plugin guide in the Piwik Developer Zone.
If you have any feedback regarding our APIs or our guides in the Developer Zone feel free to let us know.
-
How to make your plugin configurable – Introducing the Piwik Platform
18 septembre 2014, par Thomas Steur — DevelopmentThis is the next post of our blog series where we introduce the capabilities of the Piwik platform (our previous post was How to add new pages and menu items to Piwik). This time you will learn how to define settings for your plugin. For this tutorial you will need to have basic knowledge of PHP.
What can I do with settings?
The Settings API offers you a simple way to make your plugin configurable within the Admin interface of Piwik without having to deal with HTML, JavaScript, CSS or CSRF tokens. There are many things you can do with settings, for instance let users configure:
- connection infos to a third party system such as a WordPress installation.
- select a metric to be displayed in your widget
- select a refresh interval for your widget
- which menu items, reports or widgets should be displayed
- and much more
Getting started
In this series of posts, we assume that you have already set up your development environment. If not, visit the Piwik Developer Zone where you’ll find the tutorial Setting up Piwik.
To summarize the things you have to do to get setup:
- Install Piwik (for instance via git).
- Activate the developer mode:
./console development:enable --full. - Generate a plugin:
./console generate:plugin --name="MySettingsPlugin". There should now be a folderplugins/MySettingsPlugin. - And activate the created plugin under Settings => Plugins.
Let’s start creating settings
We start by using the Piwik Console to create a settings template:
./console generate:settingsThe command will ask you to enter the name of the plugin the settings should belong to. I will simply use the above chosen plugin name “MySettingsPlugin”. There should now be a file
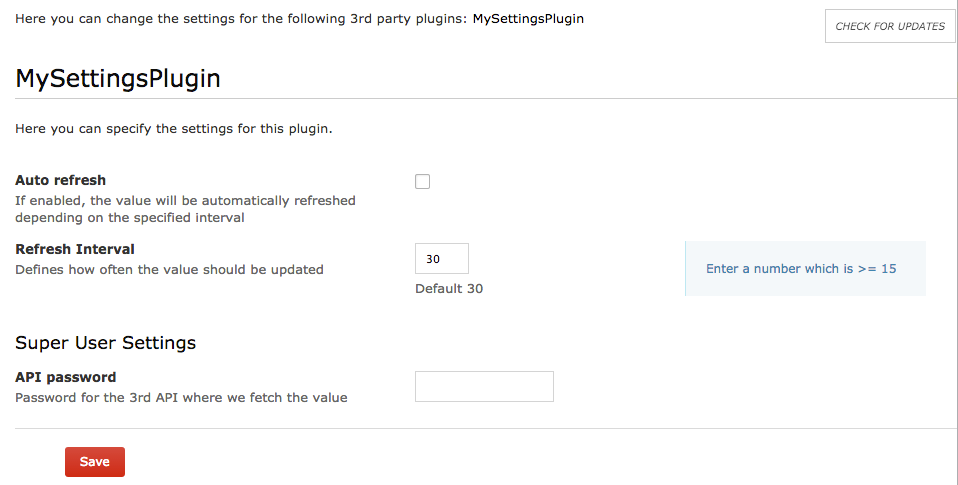
plugins/MySettingsPlugin/Settings.phpwhich contains already some examples to get you started easily. To see the settings in action go to Settings => Plugin settings in your Piwik installation.
Adding one or more settings
Settings are added in the
init()method of the settings class by calling the methodaddSetting()and passing an instance of a UserSetting or SystemSetting object. How to create a setting is explained in the next chapter.Customising a setting
To create a setting you have to define a name along some options. For instance which input field should be displayed, what type of value you expect, a validator and more. Depending on the input field we might automatically validate the values for you. For example if you define available values for a select field then we make sure to validate and store only a valid value which provides good security out of the box.
For a list of possible properties have a look at the SystemSetting and UserSetting API reference.
class Settings extends \Piwik\Plugin\Settings
{
    public $refreshInterval;

    protected function init()
    {
        $this->setIntroduction('Here you can specify the settings for this plugin.');

        $this->createRefreshIntervalSetting();
    }

    private function createRefreshIntervalSetting()
    {
        $this->refreshInterval = new UserSetting('refreshInterval', 'Refresh Interval');
        $this->refreshInterval->type = static::TYPE_INT;
        $this->refreshInterval->uiControlType = static::CONTROL_TEXT;
        $this->refreshInterval->uiControlAttributes = array('size' => 3);
        $this->refreshInterval->description = 'How often the value should be updated';
        $this->refreshInterval->inlineHelp = 'Enter a number which is >= 15';
        $this->refreshInterval->defaultValue = '30';
        $this->refreshInterval->validate = function ($value, $setting) {
            if ($value < 15) {
                throw new \Exception('Value is invalid');
            }
        };

        $this->addSetting($this->refreshInterval);
    }
}
In this example you can see some of those properties. Here we create a setting named “refreshInterval” with the display name “Refresh Interval”. We want the setting value to be an integer and the user should enter this value in a text input field having the size 3. There is a description, an inline help and a default value of 30. The validate function makes sure to accept only integers that are at least 15, otherwise an error in the UI will be shown.

You do not always have to specify a PHP
typeand auiControlType. For instance if you specify a PHP type boolean we automatically display a checkbox by default. Similarly if you specify to display a checkbox we assume that you want a boolean value.Accessing settings values
You can access the value of a setting in a widget, in a controller, in a report or anywhere you want. To access the value create an instance of your settings class and get the value like this:
$settings = new Settings();
$interval = $settings->refreshInterval->getValue()
Type of settings
The Piwik platform differentiates between UserSetting and SystemSetting. User settings can be configured by any logged in user and each user can configure the setting independently. The Piwik platform makes sure that settings are stored per user and that a user cannot see another users configuration.
A system setting applies to all of your users. It can be configured only by a user who has super user access. By default, the value can be read only by a super user as well but often you want to have it readable by anyone or at least by logged in users. If you set a setting readable the value will still be only displayed to super users but you will always be able to access the value in the background.
Imagine you are building a widget that fetches data from a third party system where you need to configure an API URL and token. While no regular user should see the value of both settings, the value should still be readable by any logged in user. Otherwise when logged in users cannot read the setting value then the data cannot be fetched in the background when this user wants to see the content of the widget. Solve this by making the setting readable by the current user:
$setting->readableByCurrentUser = !Piwik::isUserIsAnonymous();Publishing your Plugin on the Marketplace
In case you want to share your settings or your plugin with other Piwik users you can do this by pushing your plugin to a public GitHub repository and creating a tag. Easy as that. Read more about how to distribute a plugin.
Advanced features
Isn’t it easy to create settings for plugins? We never even created a file! The Settings API already offers many possibilities but it might not yet be as flexible as your use case requires. So let us know in case you are missing something and we hope to add this feature at some point in the future.
If you have any feedback regarding our APIs or our guides in the Developer Zone feel free to send it to us. -
How to make your plugin configurable – Introducing the Piwik Platform
18 septembre 2014, par Thomas Steur — DevelopmentThis is the next post of our blog series where we introduce the capabilities of the Piwik platform (our previous post was How to add new pages and menu items to Piwik). This time you will learn how to define settings for your plugin. For this tutorial you will need to have basic knowledge of PHP.
What can I do with settings?
The Settings API offers you a simple way to make your plugin configurable within the Admin interface of Piwik without having to deal with HTML, JavaScript, CSS or CSRF tokens. There are many things you can do with settings, for instance let users configure:
- connection infos to a third party system such as a WordPress installation.
- select a metric to be displayed in your widget
- select a refresh interval for your widget
- which menu items, reports or widgets should be displayed
- and much more
Getting started
In this series of posts, we assume that you have already set up your development environment. If not, visit the Piwik Developer Zone where you’ll find the tutorial Setting up Piwik.
To summarize the things you have to do to get setup:
- Install Piwik (for instance via git).
- Activate the developer mode:
./console development:enable --full. - Generate a plugin:
./console generate:plugin --name="MySettingsPlugin". There should now be a folderplugins/MySettingsPlugin. - And activate the created plugin under Settings => Plugins.
Let’s start creating settings
We start by using the Piwik Console to create a settings template:
./console generate:settingsThe command will ask you to enter the name of the plugin the settings should belong to. I will simply use the above chosen plugin name “MySettingsPlugin”. There should now be a file
plugins/MySettingsPlugin/Settings.phpwhich contains already some examples to get you started easily. To see the settings in action go to Settings => Plugin settings in your Piwik installation.Adding one or more settings
Settings are added in the
init()method of the settings class by calling the methodaddSetting()and passing an instance of a UserSetting or SystemSetting object. How to create a setting is explained in the next chapter.Customising a setting
To create a setting you have to define a name along some options. For instance which input field should be displayed, what type of value you expect, a validator and more. Depending on the input field we might automatically validate the values for you. For example if you define available values for a select field then we make sure to validate and store only a valid value which provides good security out of the box.
For a list of possible properties have a look at the SystemSetting and UserSetting API reference.
class Settings extends \Piwik\Plugin\Settings
{
    public $refreshInterval;

    protected function init()
    {
        $this->setIntroduction('Here you can specify the settings for this plugin.');

        $this->createRefreshIntervalSetting();
    }

    private function createRefreshIntervalSetting()
    {
        $this->refreshInterval = new UserSetting('refreshInterval', 'Refresh Interval');
        $this->refreshInterval->type = static::TYPE_INT;
        $this->refreshInterval->uiControlType = static::CONTROL_TEXT;
        $this->refreshInterval->uiControlAttributes = array('size' => 3);
        $this->refreshInterval->description = 'How often the value should be updated';
        $this->refreshInterval->inlineHelp = 'Enter a number which is >= 15';
        $this->refreshInterval->defaultValue = '30';
        $this->refreshInterval->validate = function ($value, $setting) {
            if ($value < 15) {
                throw new \Exception('Value is invalid');
            }
        };

        $this->addSetting($this->refreshInterval);
    }
}
In this example you can see some of those properties. Here we create a setting named “refreshInterval” with the display name “Refresh Interval”. We want the setting value to be an integer and the user should enter this value in a text input field having the size 3. There is a description, an inline help and a default value of 30. The validate function makes sure to accept only integers that are at least 15, otherwise an error in the UI will be shown.
You do not always have to specify a PHP
typeand auiControlType. For instance if you specify a PHP type boolean we automatically display a checkbox by default. Similarly if you specify to display a checkbox we assume that you want a boolean value.Accessing settings values
You can access the value of a setting in a widget, in a controller, in a report or anywhere you want. To access the value create an instance of your settings class and get the value like this:
$settings = new Settings();
$interval = $settings->refreshInterval->getValue()
Type of settings
The Piwik platform differentiates between UserSetting and SystemSetting. User settings can be configured by any logged in user and each user can configure the setting independently. The Piwik platform makes sure that settings are stored per user and that a user cannot see another users configuration.
A system setting applies to all of your users. It can be configured only by a user who has super user access. By default, the value can be read only by a super user as well but often you want to have it readable by anyone or at least by logged in users. If you set a setting readable the value will still be only displayed to super users but you will always be able to access the value in the background.
Imagine you are building a widget that fetches data from a third party system where you need to configure an API URL and token. While no regular user should see the value of both settings, the value should still be readable by any logged in user. Otherwise when logged in users cannot read the setting value then the data cannot be fetched in the background when this user wants to see the content of the widget. Solve this by making the setting readable by the current user:
$setting->readableByCurrentUser = !Piwik::isUserIsAnonymous();Publishing your Plugin on the Marketplace
In case you want to share your settings or your plugin with other Piwik users you can do this by pushing your plugin to a public GitHub repository and creating a tag. Easy as that. Read more about how to distribute a plugin.
Advanced features
Isn’t it easy to create settings for plugins? We never even created a file! The Settings API already offers many possibilities but it might not yet be as flexible as your use case requires. So let us know in case you are missing something and we hope to add this feature at some point in the future.
If you have any feedback regarding our APIs or our guides in the Developer Zone feel free to send it to us. -
New Piwik Mobile 2.1.0 is released including new features !
Piwik Mobile 2.1.0 is now available! This new version brings better support for iOS8 and includes several UI improvements, bugfixes and new features:
- Support for Segmentation [#3243] – you can now apply your custom segments in Piwik Mobile
- Better support for Events
- Clickable URL’s in a visitor’s actions list
- Expose a general setting to configure SSL certificate validation [#4688]
- Fixed the Real-Time Map was not working on Android 4.4+ [#4413]
- List of all 14 closed issues
We have also updated the underlying framework for better compatibility with new devices and improved performance. Another release to fully support iOS 8 will follow soon.
Download
Update now or install either the iOS version or the Android version.
In case you are an Android user who is not using the Google Play Store you can download Piwik Mobile 2.1.0 for Android 4+.Feel free to send us feature wishes, bug reports, wireframes, mockups or even layouts. We can improve Piwik Mobile much better with your feedback. and suggestions
-
New Piwik Mobile 2.1.0 is released including new features !
Piwik Mobile 2.1.0 is now available! This new version brings better support for iOS8 and includes several UI improvements, bugfixes and new features:
- Support for Segmentation [#3243] – you can now apply your custom segments in Piwik Mobile
- Better support for Events
- Clickable URL’s in a visitor’s actions list
- Expose a general setting to configure SSL certificate validation [#4688]
- Fixed the Real-Time Map was not working on Android 4.4+ [#4413]
- List of all 14 closed issues
We have also updated the underlying framework for better compatibility with new devices and improved performance. Another release to fully support iOS 8 will follow soon.
Download
Update now or install either the iOS version or the Android version.
In case you are an Android user who is not using the Google Play Store you can download Piwik Mobile 2.1.0 for Android 4+.Feel free to send us feature wishes, bug reports, wireframes, mockups or even layouts. We can improve Piwik Mobile much better with your feedback. and suggestions