Recherche avancée
Autres articles (111)
-
Multilang : améliorer l’interface pour les blocs multilingues
18 février 2011, parMultilang est un plugin supplémentaire qui n’est pas activé par défaut lors de l’initialisation de MediaSPIP.
Après son activation, une préconfiguration est mise en place automatiquement par MediaSPIP init permettant à la nouvelle fonctionnalité d’être automatiquement opérationnelle. Il n’est donc pas obligatoire de passer par une étape de configuration pour cela. -
Script d’installation automatique de MediaSPIP
25 avril 2011, parAfin de palier aux difficultés d’installation dues principalement aux dépendances logicielles coté serveur, un script d’installation "tout en un" en bash a été créé afin de faciliter cette étape sur un serveur doté d’une distribution Linux compatible.
Vous devez bénéficier d’un accès SSH à votre serveur et d’un compte "root" afin de l’utiliser, ce qui permettra d’installer les dépendances. Contactez votre hébergeur si vous ne disposez pas de cela.
La documentation de l’utilisation du script d’installation (...) -
Support de tous types de médias
10 avril 2011Contrairement à beaucoup de logiciels et autres plate-formes modernes de partage de documents, MediaSPIP a l’ambition de gérer un maximum de formats de documents différents qu’ils soient de type : images (png, gif, jpg, bmp et autres...) ; audio (MP3, Ogg, Wav et autres...) ; vidéo (Avi, MP4, Ogv, mpg, mov, wmv et autres...) ; contenu textuel, code ou autres (open office, microsoft office (tableur, présentation), web (html, css), LaTeX, Google Earth) (...)
Sur d’autres sites (11307)
-
ffmpeg piped output producing incorrect metadata frame count
8 décembre 2024, par XorgonThe short version : Using piped output from ffmpeg produces a file with incorrect metadata.


ffmpeg -y -i .\test_mp4.mp4 -f avi -c:v libx264 - > output.avito make an AVI file using the pipe output.

ffprobe -v error -count_frames -show_entries stream=duration,nb_read_frames,r_frame_rate .\output.avi

The output will show that the metadata does not match the actual frames contained in the video.


Details below.


Using Python, I am attempting to use ffmpeg to compress videos and put them in a PowerPoint. This works great, however, the video files themselves have incorrect frame counts which can cause issues when I read from those videos in other code.


Edit for clarification : by "frame count" I mean the metadata frame count. The actual number of frames contained in the video is correct, but querying the metadata gives an incorrect frame count.


Having eliminated the PowerPoint aspect of the code, I've narrowed this down to the following minimal reproducing example of saving an output from an ffmpeg pipe :


from subprocess import Popen, PIPE

video_path = 'test_mp4.mp4'

ffmpeg_pipe = Popen(['ffmpeg',
 '-y', # Overwrite files
 '-i', f'{video_path}', # Input from file
 '-f', 'avi', # Output format
 '-c:v', 'libx264', # Codec
 '-'], # Output to pipe
 stdout=PIPE)

new_path = "piped_video.avi"
vid_file = open(new_path, "wb")
vid_file.write(ffmpeg_pipe.stdout.read())
vid_file.close()


I've tested several different videos. One small example video that I've tested can be found here.


I've tried a few different codecs with
aviformat and triedlibvpxwithwebmformat. For theavioutputs, the frame count usually reads as1073741824(2^30). Weirdly, for thewebmformat, the frame count read as-276701161105643264.

Edit : This issue can also be reproduced with just ffmpeg in command prompt using the following command :

ffmpeg -y -i .\test_mp4.mp4 -f avi -c:v libx264 - > output.avi

This is a snippet I used to read the frame count, but one could also see the error by opening the video details in Windows Explorer and seeing the total time as something like 9942 hours, 3 minutes, and 14 seconds.


import cv2

video_path = 'test_mp4.mp4'
new_path = "piped_video.webm"

cap = cv2.VideoCapture(video_path)
print(f"Original video frame count: = {int(cap.get(cv2.CAP_PROP_FRAME_COUNT)):d}")
cap.release()

cap = cv2.VideoCapture(new_path)
print(f"Piped video frame count: = {int(cap.get(cv2.CAP_PROP_FRAME_COUNT)):d}")
cap.release()


The error can also be observed using
ffprobewith the following command :ffprobe -v error -count_frames -show_entries stream=duration,nb_read_frames,r_frame_rate .\output.avi. Note that the frame rate and number of frames counted by ffprobe do not match with the duration from the metadata.

For completeness, here is the ffmpeg output :


ffmpeg version 2023-06-11-git-09621fd7d9-full_build-www.gyan.dev Copyright (c) 2000-2023 the FFmpeg developers
 built with gcc 12.2.0 (Rev10, Built by MSYS2 project)
 configuration: --enable-gpl --enable-version3 --enable-static --disable-w32threads --disable-autodetect --enable-fontconfig --enable-iconv --enable-gnutls --enable-libxml2 --enable-gmp --enable-bzlib --enable-lzma --enable-libsnappy --enable-zlib --enable-librist --enable-libsrt --enable-libssh --enable-libzmq --enable-avisynth --enable-libbluray --enable-libcaca --enable-sdl2 --enable-libaribb24 --enable-libaribcaption --enable-libdav1d --enable-libdavs2 --enable-libuavs3d --enable-libzvbi --enable-librav1e --enable-libsvtav1 --enable-libwebp --enable-libx264 --enable-libx265 --enable-libxavs2 --enable-libxvid --enable-libaom --enable-libjxl --enable-libopenjpeg --enable-libvpx --enable-mediafoundation --enable-libass --enable-frei0r --enable-libfreetype --enable-libfribidi --enable-liblensfun --enable-libvidstab --enable-libvmaf --enable-libzimg --enable-amf --enable-cuda-llvm --enable-cuvid --enable-ffnvcodec --enable-nvdec --enable-nvenc --enable-d3d11va --enable-dxva2 --enable-libvpl --enable-libshaderc --enable-vulkan --enable-libplacebo --enable-opencl --enable-libcdio --enable-libgme --enable-libmodplug --enable-libopenmpt --enable-libopencore-amrwb --enable-libmp3lame --enable-libshine --enable-libtheora --enable-libtwolame --enable-libvo-amrwbenc --enable-libcodec2 --enable-libilbc --enable-libgsm --enable-libopencore-amrnb --enable-libopus --enable-libspeex --enable-libvorbis --enable-ladspa --enable-libbs2b --enable-libflite --enable-libmysofa --enable-librubberband --enable-libsoxr --enable-chromaprint
 libavutil 58. 13.100 / 58. 13.100
 libavcodec 60. 17.100 / 60. 17.100
 libavformat 60. 6.100 / 60. 6.100
 libavdevice 60. 2.100 / 60. 2.100
 libavfilter 9. 8.101 / 9. 8.101
 libswscale 7. 3.100 / 7. 3.100
 libswresample 4. 11.100 / 4. 11.100
 libpostproc 57. 2.100 / 57. 2.100
Input #0, mov,mp4,m4a,3gp,3g2,mj2, from 'test_mp4.mp4':
 Metadata:
 major_brand : mp42
 minor_version : 0
 compatible_brands: isommp42
 creation_time : 2022-08-10T12:54:09.000000Z
 Duration: 00:00:06.67, start: 0.000000, bitrate: 567 kb/s
 Stream #0:0[0x1](eng): Video: h264 (High) (avc1 / 0x31637661), yuv420p(progressive), 384x264 [SAR 1:1 DAR 16:11], 563 kb/s, 30 fps, 30 tbr, 30k tbn (default)
 Metadata:
 creation_time : 2022-08-10T12:54:09.000000Z
 handler_name : Mainconcept MP4 Video Media Handler
 vendor_id : [0][0][0][0]
 encoder : AVC Coding
Stream mapping:
 Stream #0:0 -> #0:0 (h264 (native) -> h264 (libx264))
Press [q] to stop, [?] for help
[libx264 @ 0000018c68c8b9c0] using SAR=1/1
[libx264 @ 0000018c68c8b9c0] using cpu capabilities: MMX2 SSE2Fast SSSE3 SSE4.2 AVX FMA3 BMI2 AVX2
[libx264 @ 0000018c68c8b9c0] profile High, level 2.1, 4:2:0, 8-bit
Output #0, avi, to 'pipe:':
 Metadata:
 major_brand : mp42
 minor_version : 0
 compatible_brands: isommp42
 ISFT : Lavf60.6.100
 Stream #0:0(eng): Video: h264 (H264 / 0x34363248), yuv420p(progressive), 384x264 [SAR 1:1 DAR 16:11], q=2-31, 30 fps, 30 tbn (default)
 Metadata:
 creation_time : 2022-08-10T12:54:09.000000Z
 handler_name : Mainconcept MP4 Video Media Handler
 vendor_id : [0][0][0][0]
 encoder : Lavc60.17.100 libx264
 Side data:
 cpb: bitrate max/min/avg: 0/0/0 buffer size: 0 vbv_delay: N/A
[out#0/avi @ 0000018c687f47c0] video:82kB audio:0kB subtitle:0kB other streams:0kB global headers:0kB muxing overhead: 3.631060%
frame= 200 fps=0.0 q=-1.0 Lsize= 85kB time=00:00:06.56 bitrate= 106.5kbits/s speed=76.2x 
[libx264 @ 0000018c68c8b9c0] frame I:1 Avg QP:16.12 size: 3659
[libx264 @ 0000018c68c8b9c0] frame P:80 Avg QP:21.31 size: 647
[libx264 @ 0000018c68c8b9c0] frame B:119 Avg QP:26.74 size: 243
[libx264 @ 0000018c68c8b9c0] consecutive B-frames: 3.0% 53.0% 0.0% 44.0%
[libx264 @ 0000018c68c8b9c0] mb I I16..4: 17.6% 70.6% 11.8%
[libx264 @ 0000018c68c8b9c0] mb P I16..4: 0.8% 1.7% 0.6% P16..4: 17.6% 4.6% 3.3% 0.0% 0.0% skip:71.4%
[libx264 @ 0000018c68c8b9c0] mb B I16..4: 0.1% 0.3% 0.2% B16..8: 11.7% 1.4% 0.4% direct: 0.6% skip:85.4% L0:32.0% L1:59.7% BI: 8.3%
[libx264 @ 0000018c68c8b9c0] 8x8 transform intra:59.6% inter:62.4%
[libx264 @ 0000018c68c8b9c0] coded y,uvDC,uvAC intra: 48.5% 0.0% 0.0% inter: 3.5% 0.0% 0.0%
[libx264 @ 0000018c68c8b9c0] i16 v,h,dc,p: 19% 39% 25% 17%
[libx264 @ 0000018c68c8b9c0] i8 v,h,dc,ddl,ddr,vr,hd,vl,hu: 21% 25% 30% 3% 3% 4% 4% 4% 5%
[libx264 @ 0000018c68c8b9c0] i4 v,h,dc,ddl,ddr,vr,hd,vl,hu: 22% 20% 16% 6% 8% 8% 8% 5% 6%
[libx264 @ 0000018c68c8b9c0] i8c dc,h,v,p: 100% 0% 0% 0%
[libx264 @ 0000018c68c8b9c0] Weighted P-Frames: Y:0.0% UV:0.0%
[libx264 @ 0000018c68c8b9c0] ref P L0: 76.2% 7.9% 11.2% 4.7%
[libx264 @ 0000018c68c8b9c0] ref B L0: 85.6% 12.9% 1.5%
[libx264 @ 0000018c68c8b9c0] ref B L1: 97.7% 2.3%
[libx264 @ 0000018c68c8b9c0] kb/s:101.19


So the question is : why does this happen, and how can one avoid it ?


-
pyqt5 gui dependent on ffmpeg compiled with pyinstaller doesn't run on other machines ?
19 octobre 2022, par SorenI am trying to create a simple Pyqt5 GUI for Windows 10 that uses OpenAI's model Whisper to transcribe a sound file and outputting the results in an Excel-file. It works on my own computer where I have installed the necessary dependencies for Whisper as stated on their github i.e. FFMEG. I provide a minimal example of my code below :


# Import library
import whisper
import os
from PyQt5 import QtCore, QtGui, QtWidgets
import pandas as pd
import xlsxwriter


class Ui_Dialog(QtWidgets.QDialog):
 
 
 # Define functions to use in GUI
 
 # Define function for selecting input files
 def browsefiles(self, Dialog):
 
 
 # Make Dialog box and save files into tuple of paths
 files = QtWidgets.QFileDialog().getOpenFileNames(self, "Select soundfiles", os.getcwd(), "lyd(*mp2 *.mp3 *.mp4 *.m4a *wma *wav)")
 
 self.liste = []
 for url in range(len(files[0])):
 self.liste.append(files[0][url]) 

 
 def model_load(self, Dialog):
 
 # Load picked model
 self.model = whisper.load_model(r'C:\Users\Søren\Downloads\Whisper_gui\models' + "\\" + self.combo_modelSize.currentText() + ".pt") ##the path is set to where the models are on the other machine
 
 
 def run(self, Dialog):
 
 # Make list for sound files
 liste_df = []
 
 
 # Running loop for interpreting and encoding sound files
 for url in range(len(self.liste)):
 
 # Make dataframe
 df = pd.DataFrame(columns=["filename", "start", "end", "text"])
 
 # Run model
 result = self.model.transcribe(self.liste[url])
 
 # Extract results
 for i in range(len(result["segments"])):
 start = result["segments"][i]["start"]
 end = result["segments"][i]["end"]
 text = result["segments"][i]["text"]
 
 df = df.append({"filename": self.liste[url].split("/")[-1],
 "start": start, 
 "end": end, 
 "text": text}, ignore_index=True)
 
 # Add detected language to dataframe
 df["sprog"] = result["language"]
 
 
 liste_df.append(df)


 # Make excel output
 
 # Concatenate list of dfs
 dataframe = pd.concat(liste_df)
 
 
 # Create a Pandas Excel writer using XlsxWriter as the engine.
 writer = pd.ExcelWriter(self.liste[0].split(".")[0] + '_OUTPUT.xlsx', engine='xlsxwriter')
 writer_wrap_format = writer.book.add_format({"text_wrap": True, 'num_format': '@'})


 # Write the dataframe data to XlsxWriter. Turn off the default header and
 # index and skip one row to allow us to insert a user defined header.
 dataframe.to_excel(writer, sheet_name="Output", startrow=1, header=False, index=False)

 # Get the xlsxwriter workbook and worksheet objects.
 #workbook = writer.book
 worksheet = writer.sheets["Output"]

 # Get the dimensions of the dataframe.
 (max_row, max_col) = dataframe.shape

 # Create a list of column headers, to use in add_table().
 column_settings = [{'header': column} for column in dataframe.columns]

 # Add the Excel table structure. Pandas will add the data.
 worksheet.add_table(0, 0, max_row, max_col - 1, {'columns': column_settings})

 # Make the columns wider for clarity.
 worksheet.set_column(0, max_col - 1, 12)
 
 in_col_no = xlsxwriter.utility.xl_col_to_name(dataframe.columns.get_loc("text"))
 
 worksheet.set_column(in_col_no + ":" + in_col_no, 30, writer_wrap_format)

 # Close the Pandas Excel writer and output the Excel file.
 writer.save()
 writer.close()
 
 
 ## Design setup
 
 def setupUi(self, Dialog):
 Dialog.setObjectName("Dialog")
 Dialog.resize(730, 400)
 
 self.select_files = QtWidgets.QPushButton(Dialog)
 self.select_files.setGeometry(QtCore.QRect(40, 62, 81, 31))
 font = QtGui.QFont()
 font.setPointSize(6)
 self.select_files.setFont(font)
 self.select_files.setObjectName("select_files")


 self.combo_modelSize = QtWidgets.QComboBox(Dialog)
 self.combo_modelSize.setGeometry(QtCore.QRect(40, 131, 100, 21))
 font = QtGui.QFont()
 font.setPointSize(6)
 self.combo_modelSize.setFont(font)
 self.combo_modelSize.setObjectName("combo_modelSize")
 
 
 self.runButton = QtWidgets.QPushButton(Dialog)
 self.runButton.setGeometry(QtCore.QRect(40, 289, 71, 21))
 font = QtGui.QFont()
 font.setPointSize(6)
 self.runButton.setFont(font)
 self.runButton.setObjectName("runButton")


 self.retranslateUi(Dialog)
 QtCore.QMetaObject.connectSlotsByName(Dialog)


 modelSize_options = ['Chose model', 'tiny', 'base', 'small', 'medium', 'large']
 self.combo_modelSize.addItems(modelSize_options)
 
 # Do an action!
 self.select_files.clicked.connect(self.browsefiles)
 self.combo_modelSize.currentIndexChanged.connect(self.model_load)
 self.runButton.clicked.connect(self.run)


 def retranslateUi(self, Dialog):
 _translate = QtCore.QCoreApplication.translate
 Dialog.setWindowTitle(_translate("Dialog", "Dialog"))
 self.runButton.setText(_translate("Dialog", "Go!"))
 self.select_files.setText(_translate("Dialog", "Select"))


if __name__ == "__main__":
 import sys
 app = QtWidgets.QApplication(sys.argv)
 Dialog = QtWidgets.QDialog()
 ui = Ui_Dialog()
 ui.setupUi(Dialog)
 Dialog.show()
 sys.exit(app.exec_())


I compile this app with pyinstaller using the following code. I had some issues to begin with so I found other with similar problems and ended up with this :


pyinstaller --onedir --hidden-import=pytorch --collect-data torch --copy-metadata torch --copy-metadata tqdm --copy-metadata tokenizers --copy-metadata importlib_metadata --hidden-import="sklearn.utils._cython_blas" --hidden-import="sklearn.neighbors.typedefs" --hidden-import="sklearn.neighbors.quad_tree" --hidden-import="sklearn.tree" --hidden-import="sklearn.tree._utils" --copy-metadata regex --copy-metadata requests --copy-metadata packaging --copy-metadata filelock --copy-metadata numpy --add-data "./ffmpeg/*;./ffmpeg/" --hidden-import=whisper --copy-metadata whisper --collect-data whisper minimal_example_whisper.py

When I take the outputtet dist directory and try to run the app on another Windows machine without FFMPEG installed (or Whisper or any other things), I get the following error from the terminal as I push the "run" button in the app (otherwise the app does run).


C:\Users\Søren>"G:\minimal_example_whisper\minimal_example_whisper.exe"
whisper\transcribe.py:70: UserWarning: FP16 is not supported on CPU; using FP32 instead
Traceback (most recent call last):
 File "minimal_example_whisper.py", line 45, in run
 File "whisper\transcribe.py", line 76, in transcribe
 File "whisper\audio.py", line 111, in log_mel_spectrogram
 File "whisper\audio.py", line 42, in load_audio
 File "ffmpeg\_run.py", line 313, in run
 File "ffmpeg\_run.py", line 284, in run_async
 File "subprocess.py", line 951, in __init__
 File "subprocess.py", line 1420, in _execute_child
FileNotFoundError: [WinError 2] Den angivne fil blev ikke fundet


I suspect this has something to do with FFMPEG not being installed on the other machines system ? Does anyone have an automatic solution for this when compiling the app or can it simply only run on machines that has FFMPEG installed ?


Thanks in advance !


-
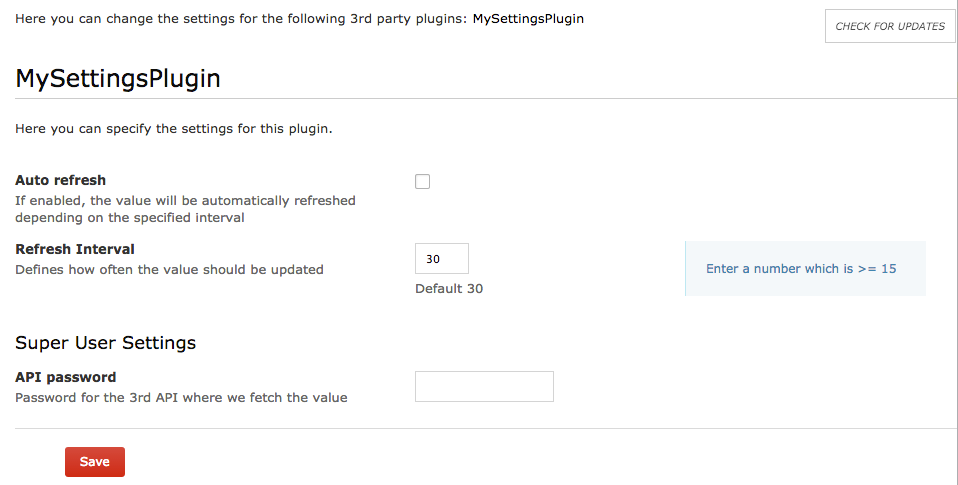
How to make your plugin configurable – Introducing the Piwik Platform
18 septembre 2014, par Thomas Steur — DevelopmentThis is the next post of our blog series where we introduce the capabilities of the Piwik platform (our previous post was How to add new pages and menu items to Piwik). This time you will learn how to define settings for your plugin. For this tutorial you will need to have basic knowledge of PHP.
What can I do with settings ?
The Settings API offers you a simple way to make your plugin configurable within the Admin interface of Piwik without having to deal with HTML, JavaScript, CSS or CSRF tokens. There are many things you can do with settings, for instance let users configure :
- connection infos to a third party system such as a WordPress installation.
- select a metric to be displayed in your widget
- select a refresh interval for your widget
- which menu items, reports or widgets should be displayed
- and much more
Getting started
In this series of posts, we assume that you have already set up your development environment. If not, visit the Piwik Developer Zone where you’ll find the tutorial Setting up Piwik.
To summarize the things you have to do to get setup :
- Install Piwik (for instance via git).
- Activate the developer mode :
./console development:enable --full. - Generate a plugin :
./console generate:plugin --name="MySettingsPlugin". There should now be a folderplugins/MySettingsPlugin. - And activate the created plugin under Settings => Plugins.
Let’s start creating settings
We start by using the Piwik Console to create a settings template :
./console generate:settingsThe command will ask you to enter the name of the plugin the settings should belong to. I will simply use the above chosen plugin name “MySettingsPlugin”. There should now be a file
plugins/MySettingsPlugin/Settings.phpwhich contains already some examples to get you started easily. To see the settings in action go to Settings => Plugin settings in your Piwik installation.
Adding one or more settings
Settings are added in the
init()method of the settings class by calling the methodaddSetting()and passing an instance of a UserSetting or SystemSetting object. How to create a setting is explained in the next chapter.Customising a setting
To create a setting you have to define a name along some options. For instance which input field should be displayed, what type of value you expect, a validator and more. Depending on the input field we might automatically validate the values for you. For example if you define available values for a select field then we make sure to validate and store only a valid value which provides good security out of the box.
For a list of possible properties have a look at the SystemSetting and UserSetting API reference.
class Settings extends \Piwik\Plugin\Settings

{

    public $refreshInterval;


    protected function init()

    {

        $this->setIntroduction('Here you can specify the settings for this plugin.');


        $this->createRefreshIntervalSetting();

    }


    private function createRefreshIntervalSetting()

    {

        $this->refreshInterval = new UserSetting('refreshInterval', 'Refresh Interval');

        $this->refreshInterval->type = static::TYPE_INT;

        $this->refreshInterval->uiControlType = static::CONTROL_TEXT;

        $this->refreshInterval->uiControlAttributes = array('size' => 3);

        $this->refreshInterval->description = 'How often the value should be updated';

        $this->refreshInterval->inlineHelp = 'Enter a number which is >= 15';

        $this->refreshInterval->defaultValue = '30';

        $this->refreshInterval->validate = function ($value, $setting) {

            if ($value < 15) {

                throw new \Exception('Value is invalid');

            }

        };


        $this->addSetting($this->refreshInterval);

    }

}
In this example you can see some of those properties. Here we create a setting named “refreshInterval” with the display name “Refresh Interval”. We want the setting value to be an integer and the user should enter this value in a text input field having the size 3. There is a description, an inline help and a default value of 30. The validate function makes sure to accept only integers that are at least 15, otherwise an error in the UI will be shown.

You do not always have to specify a PHP
typeand auiControlType. For instance if you specify a PHP type boolean we automatically display a checkbox by default. Similarly if you specify to display a checkbox we assume that you want a boolean value.Accessing settings values
You can access the value of a setting in a widget, in a controller, in a report or anywhere you want. To access the value create an instance of your settings class and get the value like this :
$settings = new Settings();

$interval = $settings->refreshInterval->getValue()
Type of settings
The Piwik platform differentiates between UserSetting and SystemSetting. User settings can be configured by any logged in user and each user can configure the setting independently. The Piwik platform makes sure that settings are stored per user and that a user cannot see another users configuration.
A system setting applies to all of your users. It can be configured only by a user who has super user access. By default, the value can be read only by a super user as well but often you want to have it readable by anyone or at least by logged in users. If you set a setting readable the value will still be only displayed to super users but you will always be able to access the value in the background.
Imagine you are building a widget that fetches data from a third party system where you need to configure an API URL and token. While no regular user should see the value of both settings, the value should still be readable by any logged in user. Otherwise when logged in users cannot read the setting value then the data cannot be fetched in the background when this user wants to see the content of the widget. Solve this by making the setting readable by the current user :
$setting->readableByCurrentUser = !Piwik::isUserIsAnonymous();Publishing your Plugin on the Marketplace
In case you want to share your settings or your plugin with other Piwik users you can do this by pushing your plugin to a public GitHub repository and creating a tag. Easy as that. Read more about how to distribute a plugin.
Advanced features
Isn’t it easy to create settings for plugins ? We never even created a file ! The Settings API already offers many possibilities but it might not yet be as flexible as your use case requires. So let us know in case you are missing something and we hope to add this feature at some point in the future.
If you have any feedback regarding our APIs or our guides in the Developer Zone feel free to send it to us.