Recherche avancée
Médias (1)
-

Somos millones 1
21 juillet 2014, par
Mis à jour : Juin 2015
Langue : français
Type : Video
Autres articles (104)
-
Encoding and processing into web-friendly formats
13 avril 2011, parMediaSPIP automatically converts uploaded files to internet-compatible formats.
Video files are encoded in MP4, Ogv and WebM (supported by HTML5) and MP4 (supported by Flash).
Audio files are encoded in MP3 and Ogg (supported by HTML5) and MP3 (supported by Flash).
Where possible, text is analyzed in order to retrieve the data needed for search engine detection, and then exported as a series of image files.
All uploaded files are stored online in their original format, so you can (...) -
Contribute to a better visual interface
13 avril 2011MediaSPIP is based on a system of themes and templates. Templates define the placement of information on the page, and can be adapted to a wide range of uses. Themes define the overall graphic appearance of the site.
Anyone can submit a new graphic theme or template and make it available to the MediaSPIP community. -
Les formats acceptés
28 janvier 2010, parLes commandes suivantes permettent d’avoir des informations sur les formats et codecs gérés par l’installation local de ffmpeg :
ffmpeg -codecs ffmpeg -formats
Les format videos acceptés en entrée
Cette liste est non exhaustive, elle met en exergue les principaux formats utilisés : h264 : H.264 / AVC / MPEG-4 AVC / MPEG-4 part 10 m4v : raw MPEG-4 video format flv : Flash Video (FLV) / Sorenson Spark / Sorenson H.263 Theora wmv :
Les formats vidéos de sortie possibles
Dans un premier temps on (...)
Sur d’autres sites (7836)
-
Output file does not show up after executing ffmpeg command [closed]
19 février 2024, par davaiI'm using ffmpeg to combine an MP3 + G file and produce an MP4 file. I've placed the source code / .exe file for 'ffmpeg' in the project folder, and the MP3 + G files are also in the project folder. I also set the MP4 output to show up in the project folder as well. The weird thing is that, initially, I was producing output files, and while trying to tweak the constant rate factor, the MP4 output just stopped showing up entirely. I'm also not receiving any errors while running the code, and it does print out that the file has been successfully created, despite nothing showing up in the project folder.


 String mp3FilePath = "C:/Users/exampleuser/pfolder/example.mp3";
 String gFilePath = "C:/Users/exampleuser/pfolder/example.cdg";
 String mp4OutputPath = "C:/Users/exampleuser/pfolder/example.mp4";

 try
 {
 String[] command = {
 "C:/Users/tonih/IdeaProjects/MP3GtoMP4Conversion/ffmpeg/ffmpeg-2024-02-19-git-0c8e64e268-full_build/bin/ffmpeg.exe",
 "-i", mp3FilePath, // Input MP3 file
 "-r", "25", // Frame rate
 "-loop", "1", // Loop input video
 "-i", gFilePath, // Input G file
 "-c:v", "libx264", // Video codec
 "-preset", "slow", // Encoding preset for quality (choose according to your requirement)
 "-crf", "18", // Constant Rate Factor (lower is higher quality, typical range 18-28)
 "-c:a", "aac", // Audio codec
 "-b:a", "320k", // Audio bitrate
 "-shortest", // Stop when the shortest stream ends
 mp4OutputPath // Output MP4 file
 };

 Process process = Runtime.getRuntime().exec(command);
 process.waitFor();
 System.out.println("MP4 file created successfully: " + mp4OutputPath);
 }
 catch (IOException | InterruptedException e)
 {
 e.printStackTrace();
 }


-
How to send a camera capture frame to YouTube streaming using ffmpeg
2 mars 2024, par 유혜진import subprocess 
import cv2

# YouTube streaming settings
YOUTUBE_URL = "rtmp://a.rtmp.youtube.com/live2/"
KEY = "..."

# OpenCV camera setup
cap = cv2.VideoCapture(0)
cap.set(cv2.CAP_PROP_FRAME_WIDTH, 640)
cap.set(cv2.CAP_PROP_FRAME_HEIGHT, 480)

# FFmpeg command for streaming
command = [r"C:\utility\ffmpeg\ffmpeg-2024-02-22-git-76b2bb96b4-full_build\ffmpeg-2024-02-22-git-76b2bb96b4-full_build\bin\ffmpeg.exe",
 '-f', 'rawvideo',
 '-pix_fmt', 'bgr24',
 '-s', '640x480',
 '-i', '-',
 '-ar', '44100',
 '-ac', '2',
 '-acodec', 'pcm_s16le',
 '-f', 's16le',
 '-ac', '2',
 '-i', 'NUL', 
 '-acodec', 'aac',
 '-ab', '128k',
 '-strict', 'experimental',
 '-vcodec', 'h264',
 '-pix_fmt', 'yuv420p',
 '-g', '50',
 '-vb', '1000k',
 '-profile:v', 'baseline',
 '-preset', 'ultrafast',
 '-r', '30',
 '-f', 'flv', 
 f"{YOUTUBE_URL}/{KEY}",]

# Open a subprocess with FFmpeg
pipe = subprocess.Popen(command, stdin=subprocess.PIPE)

while True:
 # Read a frame from the camera
 ret, frame = cap.read()
 if not ret:
 break

 # Display the frame
 cv2.imshow('Frame', frame)
 cv2.waitKey(1) # Wait for 1ms

 # Send the frame through the pipe for streaming
 pipe.stdin.write(frame.tobytes())

 # Check for 'q' key press to stop streaming
 if cv2.waitKey(1) & 0xFF == ord('q'):
 break

# Release resources
cap.release()
cv2.destroyAllWindows()


I'm trying to implement capturing the camera screen using opencv and transmitting this frame to the YouTube streaming broadcast via ffmpeg. YouTube streaming does start when I run this code. However, it appears to be a black screen, not a camera screen. I don't see what the problem is.


I didn't even start streaming at first, but I changed the command option to various things, and when I ran the code, I succeeded in starting streaming. There are many references to transmitting mp4, but there are not many references to transmitting real-time capture. I'm going to process the camera screen using opencv and then send it to streaming. I don't know what the problem is. Please help me.


-
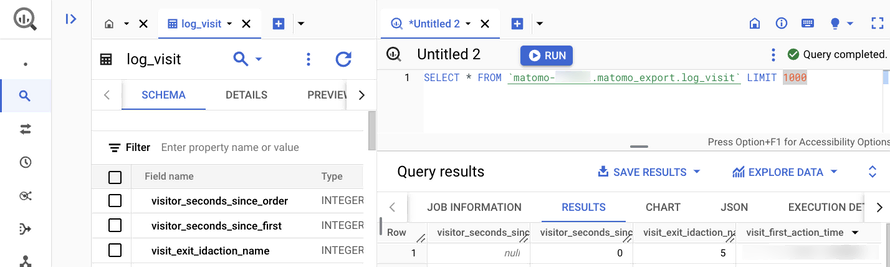
Introducing the Data Warehouse Connector feature
30 janvier, par Matomo Core Team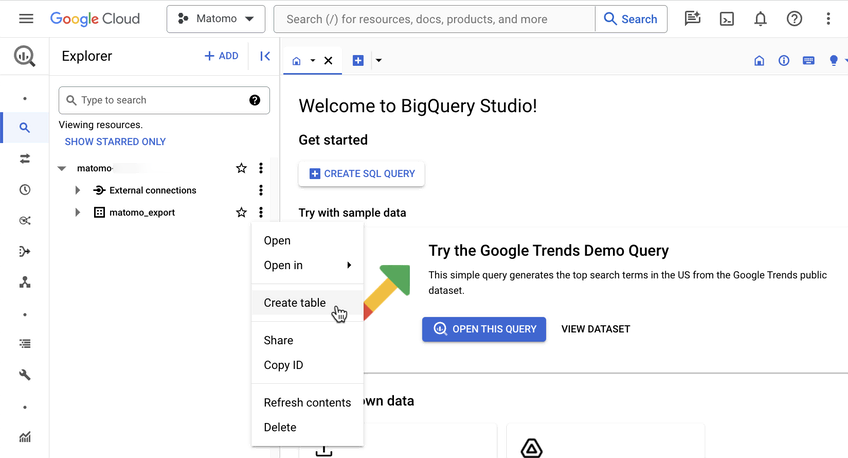
Try Matomo for Free
21 day free trial. No credit card required.


