Recherche avancée

Médias (1)

Mot : - Tags -/géodiversité

Autres articles (64)

  • Initialisation de MediaSPIP (préconfiguration)

    20 février 2010, par

    Lors de l’installation de MediaSPIP, celui-ci est préconfiguré pour les usages les plus fréquents.
    Cette préconfiguration est réalisée par un plugin activé par défaut et non désactivable appelé MediaSPIP Init.
    Ce plugin sert à préconfigurer de manière correcte chaque instance de MediaSPIP. Il doit donc être placé dans le dossier plugins-dist/ du site ou de la ferme pour être installé par défaut avant de pouvoir utiliser le site.
    Dans un premier temps il active ou désactive des options de SPIP qui ne le (...)

  • Installation en mode ferme

    4 février 2011, par

    Le mode ferme permet d’héberger plusieurs sites de type MediaSPIP en n’installant qu’une seule fois son noyau fonctionnel.
    C’est la méthode que nous utilisons sur cette même plateforme.
    L’utilisation en mode ferme nécessite de connaïtre un peu le mécanisme de SPIP contrairement à la version standalone qui ne nécessite pas réellement de connaissances spécifique puisque l’espace privé habituel de SPIP n’est plus utilisé.
    Dans un premier temps, vous devez avoir installé les mêmes fichiers que l’installation (...)

  • Formulaire personnalisable

    21 juin 2013, par

    Cette page présente les champs disponibles dans le formulaire de publication d’un média et il indique les différents champs qu’on peut ajouter. Formulaire de création d’un Media
    Dans le cas d’un document de type média, les champs proposés par défaut sont : Texte Activer/Désactiver le forum ( on peut désactiver l’invite au commentaire pour chaque article ) Licence Ajout/suppression d’auteurs Tags
    On peut modifier ce formulaire dans la partie :
    Administration > Configuration des masques de formulaire. (...)

Sur d’autres sites (9049)

  • Revision 36982 : Certaines valeurs ne passent pas dans presets ... on améliore de ce coté ...

    6 avril 2010, par kent1@… — Log

    Certaines valeurs ne passent pas dans presets ... on améliore de ce coté là
    On affiche les boutons sous les documents même dans le cas d’un retour ajax

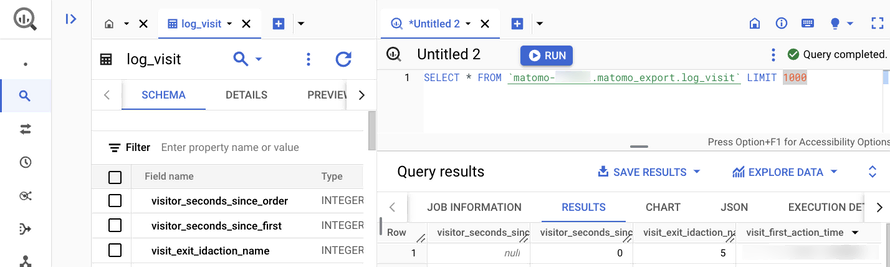
  • Introducing the Data Warehouse Connector feature

    30 janvier, par Matomo Core Team
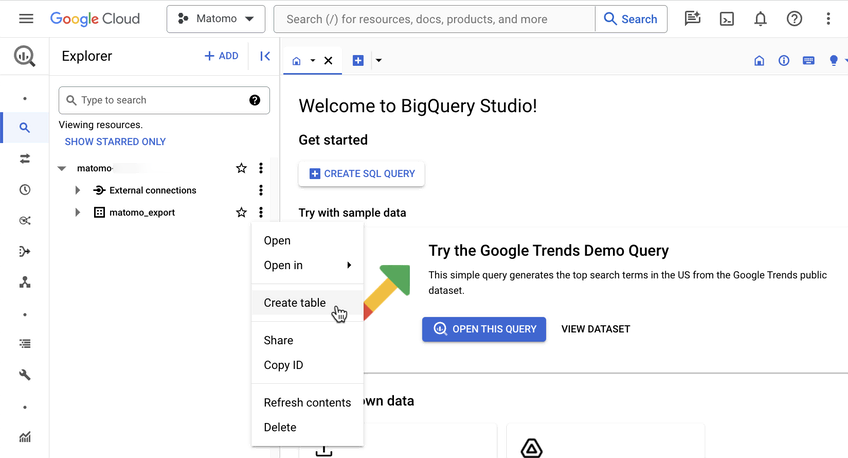
    Matomo is built on a simple truth : your data belongs to you, and you should have complete control over it. That’s why we’re excited to launch our new Data Warehouse Connector feature for Matomo Cloud, giving you even more ways to work with your analytics data. 

    Until now, getting raw data from Matomo Cloud required APIs and custom scripts, or waiting for engineering help.  

    Our new Data Warehouse Connector feature removes those barriers. You can now access your raw, unaggregated data and schedule regular exports straight to your data warehouse. 

    The feature works with all major data warehouses including (but not limited to) : 

    • Google BigQuery 
    • Amazon Redshift 
    • Snowflake 
    • Azure Synapse Analytics 
    • Apache Hive 
    • Teradata 

    You can schedule exports, combine your Matomo data with other data sources in your data warehouse, and easily query data with SQL-like queries. 

    Direct raw data access for greater data portability 

    Waiting for engineering support can delay your work. Managing API connections and writing scripts can be time-consuming. This keeps you from focusing on what you do best—analysing data. 

    BigQuery create-table-menu

    With the Data Warehouse Connector feature, you get direct access to your raw Matomo data without the technical setup. So, you can spend more time analysing data and finding insights that matter. 

    Bringing your data together 

    Answering business questions often requires data from multiple sources. A single customer interaction might span your CRM, web analytics, sales systems, and more. Piecing this data together manually is time-consuming—what starts as a seemingly simple question from stakeholders can turn into hours of work collecting and comparing data across different tools. 

    This feature lets you combine your Matomo data with data from other business systems in your data warehouse. Instead of switching between tools or manually comparing spreadsheets, you can analyse all your data in one place to better understand how customers interact with your business. 

    Easy, custom analysis with SQL-like queries 

    Standard, pre-built reports often don’t address the specific, detailed questions that analysts need to answer.  

    When you use the Data Warehouse Connector feature, you can use SQL-like queries in your data warehouse to do detailed, customised analysis. This flexibility allows you to explore your data in depth and uncover specific insights that aren’t possible with pre-built reports. 

    Here is an example of how you might use SQL-like query to compare the behaviours of paying vs. non-paying users : 

    				
                                            <xmp>SELECT  

    custom_dimension_value AS user_type, -- Assuming 'user_type' is stored in a custom dimension

    COUNT(*) AS total_visits,  

    AVG(visit_total_time) AS avg_duration,

    SUM(conversion.revenue) AS total_spent  

    FROM  

    `your_project.your_dataset.matomo_log_visit` AS visit

    LEFT JOIN  

    `your_project.your_dataset.matomo_log_conversion` AS conversion  

    ON  

    visit.idvisit = conversion.idvisit  

    GROUP BY  

    custom_dimension_value; </xmp>
                                   

    This query helps you compare metrics such as the number of visits, average session duration, and total amount spent between paying and non-paying users. It provides a full view of behavioural differences between these groups. 

    Advanced data manipulation and visualisation 

    When you need to create detailed reports or dive deep into data analysis, working within the constraints of a fixed user interface (UI) can limit your ability to draw insights. 

    Exporting your Matomo data to a data warehouse like BigQuery provides greater flexibility for in-depth manipulation and advanced visualisations, enabling you to uncover deeper insights and tailor your reports more effectively. 

    Getting started 

    To set up data warehouse exports in your Matomo : 

    1. Go to System Admin (cog icon in the top right corner) 
    2. Select ‘Export’ from the left-hand menu 
    3. Choose ‘Data Warehouse Connector’ 

    You’ll find detailed instructions in our data warehouse exports guide 

    Please note, enabling this feature will cost an additional 10% of your current subscription. You can view the exact cost by following the steps above. 

    New to Matomo ? Start your 21-day free trial now (no credit card required), or request a demo. 

  • ffmpeg - Record Server Desktop Without Connection

    21 janvier, par chrisp

    I set up an application which uses ffmpeg to record a desktop on an Amazon AWS EC2 instance having Windows Server 2012 R2 installed. It records the desktop and puts the result into a file.

    &#xA;&#xA;

    This works as long as a Remote Desktop or TeamViewer connection is active for that particular Amazon AWS EC2 instance. As soon as I close the Remote Desktop and TeamViewer connection the recording stops and continues as soon as I reconnect.

    &#xA;&#xA;

    I assume that it's because the GPU doesn't deliver frames without a display in use.

    &#xA;&#xA;

    How can I make sure that frames are constantly being rendered so that I can record them ?

    &#xA;