Recherche avancée
Médias (91)
-

Richard Stallman et le logiciel libre
19 octobre 2011, par
Mis à jour : Mai 2013
Langue : français
Type : Texte
-

Stereo master soundtrack
17 octobre 2011, par
Mis à jour : Octobre 2011
Langue : English
Type : Audio
-

Elephants Dream - Cover of the soundtrack
17 octobre 2011, par
Mis à jour : Octobre 2011
Langue : English
Type : Image
-

#7 Ambience
16 octobre 2011, par
Mis à jour : Juin 2015
Langue : English
Type : Audio
-

#6 Teaser Music
16 octobre 2011, par
Mis à jour : Février 2013
Langue : English
Type : Audio
-

#5 End Title
16 octobre 2011, par
Mis à jour : Février 2013
Langue : English
Type : Audio
Autres articles (89)
-
Le profil des utilisateurs
12 avril 2011, parChaque utilisateur dispose d’une page de profil lui permettant de modifier ses informations personnelle. Dans le menu de haut de page par défaut, un élément de menu est automatiquement créé à l’initialisation de MediaSPIP, visible uniquement si le visiteur est identifié sur le site.
L’utilisateur a accès à la modification de profil depuis sa page auteur, un lien dans la navigation "Modifier votre profil" est (...) -
Configurer la prise en compte des langues
15 novembre 2010, parAccéder à la configuration et ajouter des langues prises en compte
Afin de configurer la prise en compte de nouvelles langues, il est nécessaire de se rendre dans la partie "Administrer" du site.
De là, dans le menu de navigation, vous pouvez accéder à une partie "Gestion des langues" permettant d’activer la prise en compte de nouvelles langues.
Chaque nouvelle langue ajoutée reste désactivable tant qu’aucun objet n’est créé dans cette langue. Dans ce cas, elle devient grisée dans la configuration et (...) -
La sauvegarde automatique de canaux SPIP
1er avril 2010, parDans le cadre de la mise en place d’une plateforme ouverte, il est important pour les hébergeurs de pouvoir disposer de sauvegardes assez régulières pour parer à tout problème éventuel.
Pour réaliser cette tâche on se base sur deux plugins SPIP : Saveauto qui permet une sauvegarde régulière de la base de donnée sous la forme d’un dump mysql (utilisable dans phpmyadmin) mes_fichiers_2 qui permet de réaliser une archive au format zip des données importantes du site (les documents, les éléments (...)
Sur d’autres sites (12046)
-
How to make your plugin configurable – Introducing the Piwik Platform
18 septembre 2014, par Thomas Steur — DevelopmentThis is the next post of our blog series where we introduce the capabilities of the Piwik platform (our previous post was How to add new pages and menu items to Piwik). This time you will learn how to define settings for your plugin. For this tutorial you will need to have basic knowledge of PHP.
What can I do with settings ?
The Settings API offers you a simple way to make your plugin configurable within the Admin interface of Piwik without having to deal with HTML, JavaScript, CSS or CSRF tokens. There are many things you can do with settings, for instance let users configure :
- connection infos to a third party system such as a WordPress installation.
- select a metric to be displayed in your widget
- select a refresh interval for your widget
- which menu items, reports or widgets should be displayed
- and much more
Getting started
In this series of posts, we assume that you have already set up your development environment. If not, visit the Piwik Developer Zone where you’ll find the tutorial Setting up Piwik.
To summarize the things you have to do to get setup :
- Install Piwik (for instance via git).
- Activate the developer mode :
./console development:enable --full. - Generate a plugin :
./console generate:plugin --name="MySettingsPlugin". There should now be a folderplugins/MySettingsPlugin. - And activate the created plugin under Settings => Plugins.
Let’s start creating settings
We start by using the Piwik Console to create a settings template :
./console generate:settingsThe command will ask you to enter the name of the plugin the settings should belong to. I will simply use the above chosen plugin name “MySettingsPlugin”. There should now be a file
plugins/MySettingsPlugin/Settings.phpwhich contains already some examples to get you started easily. To see the settings in action go to Settings => Plugin settings in your Piwik installation.
Adding one or more settings
Settings are added in the
init()method of the settings class by calling the methodaddSetting()and passing an instance of a UserSetting or SystemSetting object. How to create a setting is explained in the next chapter.Customising a setting
To create a setting you have to define a name along some options. For instance which input field should be displayed, what type of value you expect, a validator and more. Depending on the input field we might automatically validate the values for you. For example if you define available values for a select field then we make sure to validate and store only a valid value which provides good security out of the box.
For a list of possible properties have a look at the SystemSetting and UserSetting API reference.
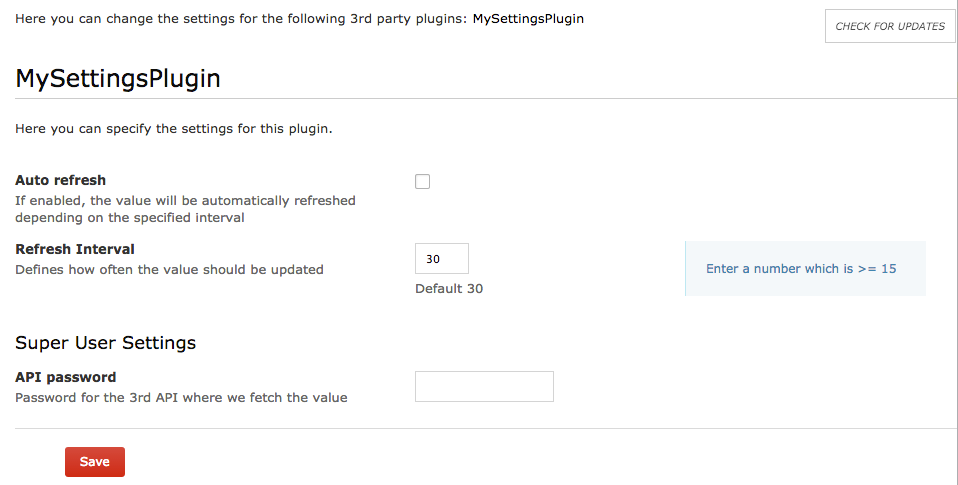
class Settings extends \Piwik\Plugin\Settings

{

    public $refreshInterval;


    protected function init()

    {

        $this->setIntroduction('Here you can specify the settings for this plugin.');


        $this->createRefreshIntervalSetting();

    }


    private function createRefreshIntervalSetting()

    {

        $this->refreshInterval = new UserSetting('refreshInterval', 'Refresh Interval');

        $this->refreshInterval->type = static::TYPE_INT;

        $this->refreshInterval->uiControlType = static::CONTROL_TEXT;

        $this->refreshInterval->uiControlAttributes = array('size' => 3);

        $this->refreshInterval->description = 'How often the value should be updated';

        $this->refreshInterval->inlineHelp = 'Enter a number which is >= 15';

        $this->refreshInterval->defaultValue = '30';

        $this->refreshInterval->validate = function ($value, $setting) {

            if ($value < 15) {

                throw new \Exception('Value is invalid');

            }

        };


        $this->addSetting($this->refreshInterval);

    }

}
In this example you can see some of those properties. Here we create a setting named “refreshInterval” with the display name “Refresh Interval”. We want the setting value to be an integer and the user should enter this value in a text input field having the size 3. There is a description, an inline help and a default value of 30. The validate function makes sure to accept only integers that are at least 15, otherwise an error in the UI will be shown.

You do not always have to specify a PHP
typeand auiControlType. For instance if you specify a PHP type boolean we automatically display a checkbox by default. Similarly if you specify to display a checkbox we assume that you want a boolean value.Accessing settings values
You can access the value of a setting in a widget, in a controller, in a report or anywhere you want. To access the value create an instance of your settings class and get the value like this :
$settings = new Settings();

$interval = $settings->refreshInterval->getValue()
Type of settings
The Piwik platform differentiates between UserSetting and SystemSetting. User settings can be configured by any logged in user and each user can configure the setting independently. The Piwik platform makes sure that settings are stored per user and that a user cannot see another users configuration.
A system setting applies to all of your users. It can be configured only by a user who has super user access. By default, the value can be read only by a super user as well but often you want to have it readable by anyone or at least by logged in users. If you set a setting readable the value will still be only displayed to super users but you will always be able to access the value in the background.
Imagine you are building a widget that fetches data from a third party system where you need to configure an API URL and token. While no regular user should see the value of both settings, the value should still be readable by any logged in user. Otherwise when logged in users cannot read the setting value then the data cannot be fetched in the background when this user wants to see the content of the widget. Solve this by making the setting readable by the current user :
$setting->readableByCurrentUser = !Piwik::isUserIsAnonymous();Publishing your Plugin on the Marketplace
In case you want to share your settings or your plugin with other Piwik users you can do this by pushing your plugin to a public GitHub repository and creating a tag. Easy as that. Read more about how to distribute a plugin.
Advanced features
Isn’t it easy to create settings for plugins ? We never even created a file ! The Settings API already offers many possibilities but it might not yet be as flexible as your use case requires. So let us know in case you are missing something and we hope to add this feature at some point in the future.
If you have any feedback regarding our APIs or our guides in the Developer Zone feel free to send it to us. -
How Media Analytics for Piwik gives you the insights you need to measure how effective your video and audio marketing is – Part 2
 2 février 2017, par InnoCraft — Community
In Part 1 we have covered some of the Media Analytics features and explained why you cannot afford to not measure the media usage on your website. Chances are, you are wasting or losing money and time by not making the most out of your marketing strategy this very second. In this part, we continue showing you some more insights you can expect to get from Media Analytics and how nicely it is integrated into Piwik.
Video, Audio and Media Player reports
Media Analytics adds several new reports around videos, audios and media players. They are all quite similar and give you similar insights so we will mainly focus on the Video Titles report.
Metrics
The above mentioned reports give you all the same insights and features so we will mainly focus on the “Video Titles” report. When you open such a report for the first time, you will see a report like this with the following metrics :

- “Impressions”, the number of times a visitor has viewed a page where this media was included.
- “Plays”, the number of times a visitor watched or listened to this media.
- “Play rate”, the percentage of visitors that watched or listened to a media after they have visited a page where this media was included.
- “Finishes”, the percentage of visitors who played a media and finished it.
- “Avg. time spent”, the average amount of time a visitor spent watching or listening to this media.
- “Avg. media length” the average length of a video or audio media file. This number may vary for example if the media is a stream.
- “Avg completion” the percentage of how much visitors have watched of a video.
If you are not sure what a certain metric means, simply hover the metric title in the UI and you will get a detailed explanation. By changing the visualization to the “All Columns Table” in the bottom of the report, you get to see even more metrics like “Plays by unique visitors”, “Impressions by unique visitors”, “Finish rate”, “Avg. time to play aka hesitation time”, “Fullscreen rate” and we are always adding more metrics.
These metrics are available for the following reports :
- “Video / Audio Titles” shows you all metrics aggregated by video or audio title
- “Video / Audio Resource URLs” shows you all metrics aggregated by the video or audio resource URL, for example “https://piwik.org/media.mp4”.
- “Video / Audio Resource URLs grouped” removes some information from the URLs like subdomain, file extensions and other information to get aggregated metrics when you provide the same media in different formats.
- “Videos per hour in website’s timezone” lets you find out how your media content is consumed depending on the hour of the day. You might realize that your media is consumed very differently in the morning vs at night.
- “Video Resolutions” lets you discover how your video is consumed depending on the resolution.
- “Media players” report is useful if you use different media players on your websites or apps and want to see how engagement with your media compares by media player.
Row evolution
At InnoCraft, we understand that static numbers are not so useful. When you see for example that yesterday 20 visitors played a certain media, would you know whether this is good or bad ? This is why we always give you the possibility to see the data in relation to the recorded data in the past. To see how a specific media performs over time, simply hover a media title or media resource URL and click on the “Row Evolution” icon.

Now you can see whether actually more or less visitors played your chosen video for the selected period. Simply click on any metric name and the chosen metrics will be plotted in the big evolution graph.
This feature is similar to the Media Overall evolution graph introduced in Part 1, but shows you a detailed evolution for an individual media title or resource.
Media details
Now that you know some of the most important media metrics, you might want to look a bit deeper into the user behaviour. For example we mentioned before the “Avg time spent on media” metric. Such an average number doesn’t let you know whether most visitors spent about the same time watching the video, or whether there were many more visitors that watched it only for a few seconds and a few that watched it for very long.
One of the ways to get this insight is by again hovering any media title or resource URL and clicking on the “Media details” icon. It will open a new popup showing you a new set of reports like these :

The “Time spent watching” and “How far visitors reached in the media” bar charts show you on the X-Axis how much time each visitor spent on watching a video and how far in the video they reached. On the Y-Axis you see the number of visitors. This lets you discover whether your users for example jump often to the middle or end of the video and which parts of your video was seen most often.

The “How often the media was watched in a certain hour” and “Which resolutions the media was watched” is similar to the reports introduced in Part 1 of the blog post. However, this time instead of showing aggregated video or audio content data, they display data for a specific media title or media resource URL.
Segmented audience log
In Part 1 we have already introduced the Audience Log and explained that it is useful to better understand the user behaviour. Just a quick recap : The Audience Log shows you chronologically every action a specific visitor has performed on your website : Which pages they viewed, how they interacted with your media, when they clicked somewhere, and much more.
By hovering a media title or a media resource and then selecting “Segmented audience log” you get to see the same log, but this time it will show only visitors that have interacted with the selected media. This will be useful for you for example when you notice an unusual value for a metric and then want to better understand why a metric is like that.

Applying segments
Media Analytics lets you apply any Piwik segment to the media reports allowing you to dice your visitors or personas multiplying the value that you get out of Media Analytics. For example you may want to apply a segment and analyze the media usage for visitors that have visited your website or mobile app for the first time vs. recurring visitors. Sometimes it may be interesting how visitors that converted a specific goal or purchased something consume your media, the possibilities are endless. We really recommend to take advantage of segments to understand your different target groups even better.
The plugin also adds a lot of new segments to your Piwik letting you segment any Piwik report by visitors that have viewed or interacted with your media. For example you could go to the “Visitors => Devices” report and apply a media segment to see which devices were used the most to view your media. You can also combine segments to see for example how often your goals were converted when a visitor viewed media for longer than 10 seconds after waiting for at least 20 seconds before playing your media and when they played at least 3 videos during their visit.
Widgets, Scheduled Reports, and more.
This is not where the fun ends. Media Analytics defines more than 15 new widgets that you can add to your dashboard or export it into a third party website. You can set up Scheduled Reports to receive the Media reports automatically via email or sms or download the report to share it with your colleagues. It works also very well with Custom Alerts and you can view the Media reports in the Piwik Mobile app for Android and iOS. Via the HTTP Reporting API you can fetch any report in various formats. The plugin is really nicely integrated into Piwik we would need some more blog posts to fully cover all the ways Media Analytics advances your Piwik experience and how you can use and dig into all the data to increase your conversions and sales.
How to get Media Analytics and related features
You can get Media Analytics on the Piwik Marketplace. If you want to learn more about this feature, you might be also interested in the Media Analytics User Guide and the Media Analytics FAQ.
-
WebVTT Discussions at FOMS
1er janvier 2014, par silviaAt the recent FOMS (Foundations of Open Media Software and Standards) Developer Workshop, we had a massive focus on WebVTT and the state of its feature set. You will find links to summaries of the individual discussions in the FOMS Schedule page. Here are some of the key results I went away with.
1. WebVTT Regions
The key driving force for improvements to WebVTT continues to be the accurate representation of CEA608/708 captioning. As part of that drive, we’ve introduced regions (the CEA708 “window” concept) to WebVTT. WebVTT regions satisfy multiple requirements of CEA608/708 captions :
- support for rollup captions
- support for background color and border color on a group of cues independent of the background color of the individual cue
- possibility to move a group of cues from one location on screen to a different
- support to specify an anchor point and a growth direction for cues when their text size changes
- support for specifying a fixed number of lines to be rendered
- possibility to specify which region is rendered in front of which other one when regions overlap
While WebVTT regions enable us to satisfy all of the above points, the specification isn’t actually complete yet and some of the above needs aren’t satisfied yet.
We have an open bug to move a region elsewhere. A first discussion at FOMS seemed to to indicate that we’ll have to add syntax for updating a region at a particular time and thus give region definitions a way to be valid only for a certain time frame. I can imagine that the region definitions that we have in the header of the WebVTT file now would have an implicitly defined time frame from the start to the end of the file, but can be overruled by a re-definition anywhere within the WebVTT file. That redefinition needs to provide a start and end time.
We registered a bug to add specifying the width and height of regions (and possibly of cues) by em (i.e. by multiples of the largest character in a font). This should allow us to have the region grow/shrink around the region anchor point with a change of font size by script or a user. em specifications should also be applied to cues – that matches the column count of CEA708/608 better.
When regions overlap, the original region extension spec already suggested a “layer” cue setting. It will be easy to add it.
Another change that we will ultimately need is the “scroll” setting : we will need to introduce support for scrolling text down or from left-to-right or right-to-left, e.g. vertical scrolling text seems to be used in some Chinese caption use cases.
2. Unify Rendering Approach
The introduction of regions created a second code path in the rendering spec with some duplication. At FOMS we discussed if it was possible to unify that. The suggestion is to render all cues into a region. Those that are not part of a region would be rendered into an anonymous region that covers the complete viewport. There may be some consequences to this, e.g. cue settings should be usable across all cues, no matter whether or not part of a region, and avoiding cue overlap may need to be done within regions.
Here’s a rough outline of the path of the new rendering algorithm :
(1) Render the regions :
Specified Region Anonymous Region Render values as given : Render following values : - width
- lines
- regionanchor
- viewportanchor
- scroll
- 100%
- videoheight/lineheight
- 0,0
- 0,0
- none
(2) Render the cues :
- Create a cue box and put it in its region (anonymous if none given).
- Calculate position & size of cue box from cue settings (position, line, size).
- Calculate position of cue text inside cue box from remaining cue settings (vertical, align).
3. Vertical Features
WebVTT includes vertical rendering, both right-to-left and left-to-right. However, regions are not defined for vertical. Eventually, we’re going to have to look at the vertical features of WebVTT with more details and figure out whether the spec is working for them and what real-world requirements we have missed. We hope we can get some help from users in countries where vertically rendered captions/subtitles are the norm.
4. Best Practices
Some of he WebVTT users at FOMS suggested it would be advantageous to start a list of “best practices” for how to author captions with WebVTT. Example recommendations are :
- Use line numbers only to position cues from top or bottom of viewport. Don’t use otherwise.
- Note that when the user increases the fontsize in rollup captions and thus introduces new line breaks, your cues will roll by faster because the number of lines of a rollup is fixed.
- Make sure to use &lrm ; and &rlm ; UTF-8 markers to control the directionality of your text.
It would be nice if somebody started such a document.
5. Non-caption use cases
Instead of continuing to look back and improve our support of captions/subtitles in WebVTT, one session at FOMS also went ahead and looked forward to other use cases. The following requirements came out of this :
5.1 Preview Thumbnails
A common use case for timed data is the use of preview thumbnails on the navigation bar of videos. A native implementation of preview thumbnails would allow crawlers and search engines to have a standardised way of extracting timed images for media files, so introduction of a new @kind value “thumbnails” was suggested.
The content of a “thumbnails” cue could be any of :
- an image URL
- a sprite URL to a single image
- a spatial & temporal media fragment URL to a media resource
- base64 encoded image (data URI)
- an iframe offset to the media resource
The suggestion is to allow anything that would work in a img @src attribute as value in a cue of @kind=”thumbnails”. Responsive images might also be useful for a track of @kind=”thumbnails”. It may even be possible to define an inband thumbnail track based on the track of @kind=”thumbnails”. Such cues should also work in the JavaScript track API.
5.2 Chapter markers
There is interest to put richer content than just a chapter title into chapter cues. Often, chapters consist of a title, text and and image. The text is not so important, but the image is used almost everywhere that chapters are used. There may be a need to extend chapter cue content with images, similar to what a @kind=”thumbnails” track offers.
The conclusion that we arrived at was that we need to make @kind=”thumbnails” work first and then look at using the learnings from that to extend @kind=”chapters”.
5.3 Inband tracks for live video
A difficult topic was opened with the question of how to transport text tracks in live video. In live captioning, end times are never created for cues, but are implied by the start time of the next cue. This is a use case that hasn’t been addressed in HTML5/WebVTT yet. An old proposal to allow a special end time value of “NEXT” was discussed and recommended for adoption. Also, there was support for the spec change that stops blocking loading VTT until all cues have been loaded.
5.4 Cross-domain VTT loading
A brief discussion centered around the fact that the spec disallows cross-domain loading of WebVTT files, but that no browser implements this. This needs to be discussion at the HTML WG level.
6. Regions in live captioning
The final topic that we discussed was how we could provide support for regions in live captioning.
- The currently active region definitions will need to be come part of every header of every VTT file segment that HLS uses, so it’s available in case the cues in the segment file reference it.
- “NEXT” in end time markers would make authoring of live captioned VTT files easier.
- If the application wants to use 1 word at a time and doesn’t want to delay sending the word until the full cue is authored (e.g. in a Hangout type environment), we will need to introduce the concept of “cue continuation markers”, so we know that a cue could be extended with the next VTT file fragment.
This is an extensive and impressive amount of discussion around WebVTT and a lot of new work to be performed in the future. I’m very grateful for all the people who have contributed to these discussions at FOMS and will hopefully continue to help get the specifications right.