Recherche avancée
Médias (17)
-

Matmos - Action at a Distance
15 septembre 2011, par
Mis à jour : Septembre 2011
Langue : English
Type : Audio
-

DJ Dolores - Oslodum 2004 (includes (cc) sample of “Oslodum” by Gilberto Gil)
15 septembre 2011, par
Mis à jour : Septembre 2011
Langue : English
Type : Audio
-

Danger Mouse & Jemini - What U Sittin’ On ? (starring Cee Lo and Tha Alkaholiks)
15 septembre 2011, par
Mis à jour : Septembre 2011
Langue : English
Type : Audio
-

Cornelius - Wataridori 2
15 septembre 2011, par
Mis à jour : Septembre 2011
Langue : English
Type : Audio
-

The Rapture - Sister Saviour (Blackstrobe Remix)
15 septembre 2011, par
Mis à jour : Septembre 2011
Langue : English
Type : Audio
-

Chuck D with Fine Arts Militia - No Meaning No
15 septembre 2011, par
Mis à jour : Septembre 2011
Langue : English
Type : Audio
Autres articles (59)
-
Publier sur MédiaSpip
13 juin 2013Puis-je poster des contenus à partir d’une tablette Ipad ?
Oui, si votre Médiaspip installé est à la version 0.2 ou supérieure. Contacter au besoin l’administrateur de votre MédiaSpip pour le savoir -
HTML5 audio and video support
13 avril 2011, parMediaSPIP uses HTML5 video and audio tags to play multimedia files, taking advantage of the latest W3C innovations supported by modern browsers.
The MediaSPIP player used has been created specifically for MediaSPIP and can be easily adapted to fit in with a specific theme.
For older browsers the Flowplayer flash fallback is used.
MediaSPIP allows for media playback on major mobile platforms with the above (...) -
Support audio et vidéo HTML5
10 avril 2011MediaSPIP utilise les balises HTML5 video et audio pour la lecture de documents multimedia en profitant des dernières innovations du W3C supportées par les navigateurs modernes.
Pour les navigateurs plus anciens, le lecteur flash Flowplayer est utilisé.
Le lecteur HTML5 utilisé a été spécifiquement créé pour MediaSPIP : il est complètement modifiable graphiquement pour correspondre à un thème choisi.
Ces technologies permettent de distribuer vidéo et son à la fois sur des ordinateurs conventionnels (...)
Sur d’autres sites (8962)
-
Streaming without Content-Length in response
29 août 2011, par kainI'm using Node.js, Express (and connect), and fluent-ffmpeg.
We want to stream audio files that are stored on Amazon S3 through http.
We have all working, except that we would like to add a feature, the on-the-fly conversion of the stream through ffmpeg.
This is working well, the problem is that some browsers checks in advance before actually getting the file.
Incoming requests containing the Range header, for which we reply with a 206 with all the info from S3, have a fundamental problem : we need to know in advance the content-length of the file.
We don't know that since it is going through ffmpeg.
One solution might be to write out the resulting content-length directly on S3 when storing the file (in a special header), but this means we have to go through the pain of having queues to encode after upload just to know the size for future requests.
It also means that if we change compressor or preset we have to go through all this over again, so it is not a viable solution.We also noticed big differencies in the way Chrome and Safari request the audio tag src, but this may be discussion for another topic.
Fact is that without a proper content-length header in response everything seems to break or browsers goes in an infinite loop or restart the stream at pleasure.
Ideas ?
-
How to make your plugin configurable – Introducing the Piwik Platform
18 septembre 2014, par Thomas Steur — DevelopmentThis is the next post of our blog series where we introduce the capabilities of the Piwik platform (our previous post was How to add new pages and menu items to Piwik). This time you will learn how to define settings for your plugin. For this tutorial you will need to have basic knowledge of PHP.
What can I do with settings ?
The Settings API offers you a simple way to make your plugin configurable within the Admin interface of Piwik without having to deal with HTML, JavaScript, CSS or CSRF tokens. There are many things you can do with settings, for instance let users configure :
- connection infos to a third party system such as a WordPress installation.
- select a metric to be displayed in your widget
- select a refresh interval for your widget
- which menu items, reports or widgets should be displayed
- and much more
Getting started
In this series of posts, we assume that you have already set up your development environment. If not, visit the Piwik Developer Zone where you’ll find the tutorial Setting up Piwik.
To summarize the things you have to do to get setup :
- Install Piwik (for instance via git).
- Activate the developer mode :
./console development:enable --full. - Generate a plugin :
./console generate:plugin --name="MySettingsPlugin". There should now be a folderplugins/MySettingsPlugin. - And activate the created plugin under Settings => Plugins.
Let’s start creating settings
We start by using the Piwik Console to create a settings template :
./console generate:settingsThe command will ask you to enter the name of the plugin the settings should belong to. I will simply use the above chosen plugin name “MySettingsPlugin”. There should now be a file
plugins/MySettingsPlugin/Settings.phpwhich contains already some examples to get you started easily. To see the settings in action go to Settings => Plugin settings in your Piwik installation.
Adding one or more settings
Settings are added in the
init()method of the settings class by calling the methodaddSetting()and passing an instance of a UserSetting or SystemSetting object. How to create a setting is explained in the next chapter.Customising a setting
To create a setting you have to define a name along some options. For instance which input field should be displayed, what type of value you expect, a validator and more. Depending on the input field we might automatically validate the values for you. For example if you define available values for a select field then we make sure to validate and store only a valid value which provides good security out of the box.
For a list of possible properties have a look at the SystemSetting and UserSetting API reference.
class Settings extends \Piwik\Plugin\Settings
{
public $refreshInterval;
protected function init()
{
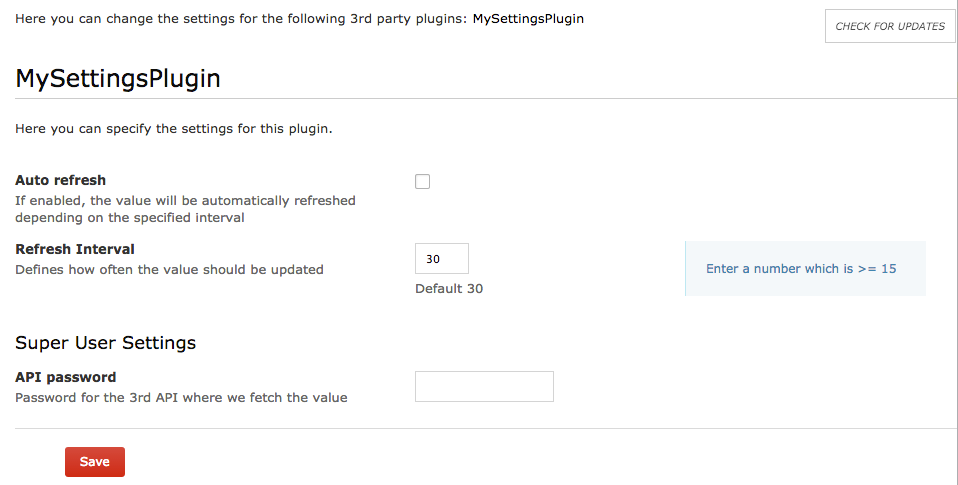
$this->setIntroduction('Here you can specify the settings for this plugin.');
$this->createRefreshIntervalSetting();
}
private function createRefreshIntervalSetting()
{
$this->refreshInterval = new UserSetting('refreshInterval', 'Refresh Interval');
$this->refreshInterval->type = static::TYPE_INT;
$this->refreshInterval->uiControlType = static::CONTROL_TEXT;
$this->refreshInterval->uiControlAttributes = array('size' => 3);
$this->refreshInterval->description = 'How often the value should be updated';
$this->refreshInterval->inlineHelp = 'Enter a number which is >= 15';
$this->refreshInterval->defaultValue = '30';
$this->refreshInterval->validate = function ($value, $setting) {
if ($value < 15) {
throw new \Exception('Value is invalid');
}
};
$this->addSetting($this->refreshInterval);
}
}In this example you can see some of those properties. Here we create a setting named “refreshInterval” with the display name “Refresh Interval”. We want the setting value to be an integer and the user should enter this value in a text input field having the size 3. There is a description, an inline help and a default value of 30. The validate function makes sure to accept only integers that are at least 15, otherwise an error in the UI will be shown.

You do not always have to specify a PHP
typeand auiControlType. For instance if you specify a PHP type boolean we automatically display a checkbox by default. Similarly if you specify to display a checkbox we assume that you want a boolean value.Accessing settings values
You can access the value of a setting in a widget, in a controller, in a report or anywhere you want. To access the value create an instance of your settings class and get the value like this :
$settings = new Settings();

$interval = $settings->refreshInterval->getValue()
Type of settings
The Piwik platform differentiates between UserSetting and SystemSetting. User settings can be configured by any logged in user and each user can configure the setting independently. The Piwik platform makes sure that settings are stored per user and that a user cannot see another users configuration.
A system setting applies to all of your users. It can be configured only by a user who has super user access. By default, the value can be read only by a super user as well but often you want to have it readable by anyone or at least by logged in users. If you set a setting readable the value will still be only displayed to super users but you will always be able to access the value in the background.
Imagine you are building a widget that fetches data from a third party system where you need to configure an API URL and token. While no regular user should see the value of both settings, the value should still be readable by any logged in user. Otherwise when logged in users cannot read the setting value then the data cannot be fetched in the background when this user wants to see the content of the widget. Solve this by making the setting readable by the current user :
$setting->readableByCurrentUser = !Piwik::isUserIsAnonymous();Publishing your Plugin on the Marketplace
In case you want to share your settings or your plugin with other Piwik users you can do this by pushing your plugin to a public GitHub repository and creating a tag. Easy as that. Read more about how to distribute a plugin.
Advanced features
Isn’t it easy to create settings for plugins ? We never even created a file ! The Settings API already offers many possibilities but it might not yet be as flexible as your use case requires. So let us know in case you are missing something and we hope to add this feature at some point in the future.
If you have any feedback regarding our APIs or our guides in the Developer Zone feel free to send it to us. -
How to add new pages and menu items to Piwik – Introducing the Piwik Platform
11 septembre 2014, par Thomas Steur — DevelopmentThis is the next post of our blog series where we introduce the capabilities of the Piwik platform (our previous post was How to create a widget). This time you’ll learn how to extend Piwik by adding new pages and menu items. For this tutorial you will need to have basic knowledge of PHP and optionally of Twig which is the template engine we use.
What can be displayed in a page ?
To make it short : You can display any corporate related content, key metrics, news, help pages, custom reports, contact details, information about your server, forms to manage any data and anything else.
Getting started
In this series of posts, we assume that you have already set up your development environment. If not, visit the Piwik Developer Zone where you’ll find the tutorial Setting up Piwik.
To summarize the things you have to do to get setup :
- Install Piwik (for instance via git).
- Activate the developer mode :
./console development:enable --full. - Generate a plugin :
./console generate:plugin --name="MyControllerPlugin". There should now be a folderplugins/MyControllerPlugin. - And activate the created plugin under Settings => Plugins.
Let’s start creating a page
We start by using the Piwik Console to create a new page :
./console generate:controllerThe command will ask you to enter the name of the plugin the controller should belong to. I will simply use the above chosen plugin name “MyControllerPlugin”. There should now be two files
plugins/MyControllerPlugin/Controller.phpandplugins/MyControllerPlugin/templates/index.twigwhich both already contain an example to get you started easily :Controller.php
- class Controller extends \Piwik\Plugin\Controller
- {
- public function index()
- {
- 'answerToLife' => 42
- ));
- }
- }
and templates/index.twig
- {% extends 'dashboard.twig' %}
- {% block content %}
- <strong>Hello world!</strong>
- <br/>
- The answer to life is {{ answerToLife }}
- {% endblock %}
Note : If you are generating the Controller before Piwik 2.7.0 the example will look slightly different.
The controller action
indexassigns the view variableanswerToLifeto the view and renders the Twig templatetemplates/index.twig. Any variable assigned this way can then be used in the view using for example{{ answerToLife }}.Using a Twig template to generate the content of your page is actually optional : instead feel free to generate any content as desired and return a string in your controller action.
As the above template
index.twigis extending the dashboard template the Logo as well as the top menu will automatically appear on top of your content which is defined within the blockcontent.
How to display the page within the admin
If you would like to add the admin menu on the left you have to modify the following parts :
- Extend
\Piwik\Plugin\ControllerAdmininstead of\Piwik\Plugin\Controllerin the fileController.php. In a future version of Piwik this step will be no longer neccessary, see #6151 - Extend the template
admin.twiginstead ofdashboard.twig - Define a headline using an H2-element
- {% extends 'admin.twig' %}
- {% block content %}
- <h2>Hello world!</h2>
- <br/>
- The answer to life is {{ answerToLife }}
- {% endblock %}
Note : Often one needs to add a page to the admin to make a plugin configurable. We have a unified solution for this using the Settings API.

How to display a blank page
If you would like to generate a blank page that shows only your content the template should contain only your markup as follows :
- <strong>Hello world!</strong>
- <br/>
- The answer to life is {{ answerToLife }}
Predefined variables, UI components, security and accessing query parameters
In this blog post we only cover the basics to get you started. We highly recommend to read the MVC guide on our developer pages which covers some of those advanced topics. For instance you might be wondering how to securely access
$_GETor$_POSTparameters, you might want to restrict the content of your page depending on a user role, and much more.If you would like to know how to make use of JavaScript, CSS and Less have a look at our Working with Piwik’s UI guide.
Note : How to include existing UI components such as a site selector or a date selector will be covered in a future blog post. Also, there are default variables assigned to the view depending on the context. A list of those variables that may or may not be defined is unfortunately not available yet but we will catch up on this.
Let’s add a menu item to make the page accessible
So far you have created a page but you can still not access it. Therefore we need to add a menu item to one of the Piwik menus. We start by using the Piwik Console to create a menu template :
./console generate:menuThe command will ask you to enter the name of the plugin the menu should belong to. I will use again the above chosen plugin name “MyControllerPlugin”. There should now be a file
plugins/MyControllerPlugin/Menu.phpwhich contains an example to get you started easily :Menu.php
- class Menu extends \Piwik\Plugin\Menu
- {
- public function configureUserMenu(MenuUser $menu)
- {
- // reuse an existing category.
- $menu->addManageItem('My User Item', $this->urlForAction('showList'));
- // or create a custom category
- $menu->addItem('My Custom Category', 'My User Item', $this->urlForDefaultAction());
- }
- }
This is only a part of the generated template since all the examples of the different menus are similar. You can add items to four menus :
configureReportingMenuTo add a new item to the reporting menu which includes all the reports like “Actions” and “Visitors”.configureAdminMenuTo add a new item to the admin menu which includes items like “User settings” and “Websites”.configureTopMenuTo add a new item to the top menu which includes items like “All Websites” and “Logout”.configureUserMenuTo add a new item to the user menu which is accessible when clicking on the username on the top right.
In this blog post we will add a new item to the user menu and to do so we adjust the generated template like this :
- class Menu extends \Piwik\Plugin\Menu
- {
- public function configureUserMenu(MenuUser $menu)
- {
- $menu->addManageItem('My User Item', $this->urlForAction($method = 'index'), $orderId = 30);
- }
- }
That’s it. This will add a menu item named “My User Item” to the “Manage” section of the user menu. When a user chooses the menu item, the “index” method of your controller will be executed and your previously created page will be first rendered and then displayed. Optionally, you can define an order to influence the position of the menu item within the manage section. Following this example you can add an item to any menu for any action. I think you get the point !

Note : In Piwik 2.6.0 and before the above example would look like this :
- class Menu extends \Piwik\Plugin\Menu
- {
- public function configureUserMenu(MenuUser $menu)
- {
- $menu->addManageItem('My User Item', array($module = 'MyControllerPlugin', $action = 'index'), $orderId = 30);
- }
- }
How to test a page
After you have created your page you are surely wondering how to test it. A controller should be usually very simple as it is only the connector between model and view. Therefore, we do usually not create unit or integration test for controllers and for the view less than ever. Instead we would create a UI test that takes a screenshot of your page and compares it with an expected screenshot. Luckily, there is already a section UI tests in our Automated tests guide.
Publishing your Plugin on the Marketplace
In case you want to share your page with other Piwik users you can do this by pushing your plugin to a public GitHub repository and creating a tag. Easy as that. Read more about how to distribute a plugin.
Advanced features
Isn’t it easy to create a page ? We never even created a file ! Of course, based on our API design principle “The complexity of our API should never exceed the complexity of your use case.” you can accomplish more if you want : You can make use of Vanilla JavaScript, jQuery, AngularJS, Less and CSS, you can reuse UI components, you can access query parameters and much more.
Would you like to know more about this ? Go to our MVC (Model-View-Controller) and Working with Piwik’s UI guides in the Piwik Developer Zone.
If you have any feedback regarding our APIs or our guides in the Developer Zone feel free to send it to us.