Recherche avancée
Autres articles (49)
-
Websites made with MediaSPIP
2 mai 2011, parThis page lists some websites based on MediaSPIP.
-
Creating farms of unique websites
13 avril 2011, parMediaSPIP platforms can be installed as a farm, with a single "core" hosted on a dedicated server and used by multiple websites.
This allows (among other things) : implementation costs to be shared between several different projects / individuals rapid deployment of multiple unique sites creation of groups of like-minded sites, making it possible to browse media in a more controlled and selective environment than the major "open" (...) -
Other interesting software
13 avril 2011, parWe don’t claim to be the only ones doing what we do ... and especially not to assert claims to be the best either ... What we do, we just try to do it well and getting better ...
The following list represents softwares that tend to be more or less as MediaSPIP or that MediaSPIP tries more or less to do the same, whatever ...
We don’t know them, we didn’t try them, but you can take a peek.
Videopress
Website : http://videopress.com/
License : GNU/GPL v2
Source code : (...)
Sur d’autres sites (5431)
-
How to make your plugin configurable – Introducing the Piwik Platform
18 septembre 2014, par Thomas Steur — DevelopmentThis is the next post of our blog series where we introduce the capabilities of the Piwik platform (our previous post was How to add new pages and menu items to Piwik). This time you will learn how to define settings for your plugin. For this tutorial you will need to have basic knowledge of PHP.
What can I do with settings ?
The Settings API offers you a simple way to make your plugin configurable within the Admin interface of Piwik without having to deal with HTML, JavaScript, CSS or CSRF tokens. There are many things you can do with settings, for instance let users configure :
- connection infos to a third party system such as a WordPress installation.
- select a metric to be displayed in your widget
- select a refresh interval for your widget
- which menu items, reports or widgets should be displayed
- and much more
Getting started
In this series of posts, we assume that you have already set up your development environment. If not, visit the Piwik Developer Zone where you’ll find the tutorial Setting up Piwik.
To summarize the things you have to do to get setup :
- Install Piwik (for instance via git).
- Activate the developer mode :
./console development:enable --full. - Generate a plugin :
./console generate:plugin --name="MySettingsPlugin". There should now be a folderplugins/MySettingsPlugin. - And activate the created plugin under Settings => Plugins.
Let’s start creating settings
We start by using the Piwik Console to create a settings template :
./console generate:settingsThe command will ask you to enter the name of the plugin the settings should belong to. I will simply use the above chosen plugin name “MySettingsPlugin”. There should now be a file
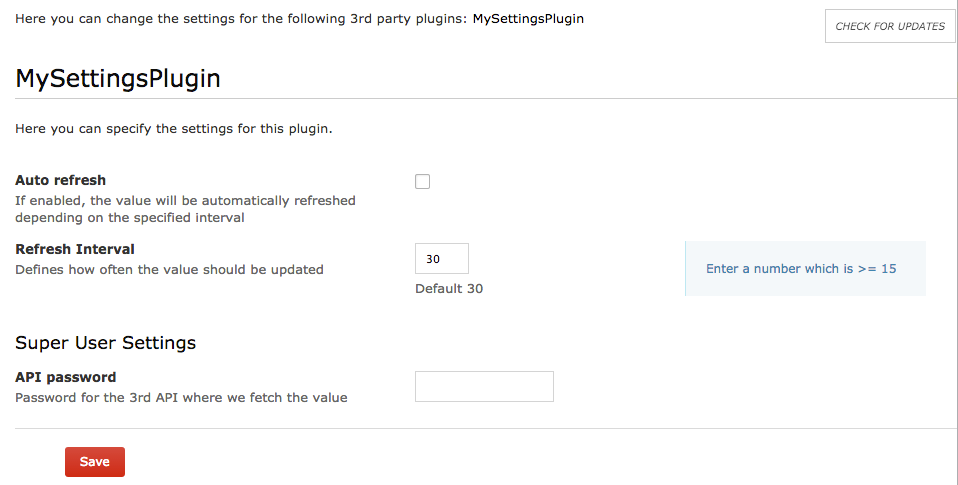
plugins/MySettingsPlugin/Settings.phpwhich contains already some examples to get you started easily. To see the settings in action go to Settings => Plugin settings in your Piwik installation.
Adding one or more settings
Settings are added in the
init()method of the settings class by calling the methodaddSetting()and passing an instance of a UserSetting or SystemSetting object. How to create a setting is explained in the next chapter.Customising a setting
To create a setting you have to define a name along some options. For instance which input field should be displayed, what type of value you expect, a validator and more. Depending on the input field we might automatically validate the values for you. For example if you define available values for a select field then we make sure to validate and store only a valid value which provides good security out of the box.
For a list of possible properties have a look at the SystemSetting and UserSetting API reference.
class Settings extends \Piwik\Plugin\Settings

{

    public $refreshInterval;


    protected function init()

    {

        $this->setIntroduction('Here you can specify the settings for this plugin.');


        $this->createRefreshIntervalSetting();

    }


    private function createRefreshIntervalSetting()

    {

        $this->refreshInterval = new UserSetting('refreshInterval', 'Refresh Interval');

        $this->refreshInterval->type = static::TYPE_INT;

        $this->refreshInterval->uiControlType = static::CONTROL_TEXT;

        $this->refreshInterval->uiControlAttributes = array('size' => 3);

        $this->refreshInterval->description = 'How often the value should be updated';

        $this->refreshInterval->inlineHelp = 'Enter a number which is >= 15';

        $this->refreshInterval->defaultValue = '30';

        $this->refreshInterval->validate = function ($value, $setting) {

            if ($value < 15) {

                throw new \Exception('Value is invalid');

            }

        };


        $this->addSetting($this->refreshInterval);

    }

}
In this example you can see some of those properties. Here we create a setting named “refreshInterval” with the display name “Refresh Interval”. We want the setting value to be an integer and the user should enter this value in a text input field having the size 3. There is a description, an inline help and a default value of 30. The validate function makes sure to accept only integers that are at least 15, otherwise an error in the UI will be shown.

You do not always have to specify a PHP
typeand auiControlType. For instance if you specify a PHP type boolean we automatically display a checkbox by default. Similarly if you specify to display a checkbox we assume that you want a boolean value.Accessing settings values
You can access the value of a setting in a widget, in a controller, in a report or anywhere you want. To access the value create an instance of your settings class and get the value like this :
$settings = new Settings();

$interval = $settings->refreshInterval->getValue()
Type of settings
The Piwik platform differentiates between UserSetting and SystemSetting. User settings can be configured by any logged in user and each user can configure the setting independently. The Piwik platform makes sure that settings are stored per user and that a user cannot see another users configuration.
A system setting applies to all of your users. It can be configured only by a user who has super user access. By default, the value can be read only by a super user as well but often you want to have it readable by anyone or at least by logged in users. If you set a setting readable the value will still be only displayed to super users but you will always be able to access the value in the background.
Imagine you are building a widget that fetches data from a third party system where you need to configure an API URL and token. While no regular user should see the value of both settings, the value should still be readable by any logged in user. Otherwise when logged in users cannot read the setting value then the data cannot be fetched in the background when this user wants to see the content of the widget. Solve this by making the setting readable by the current user :
$setting->readableByCurrentUser = !Piwik::isUserIsAnonymous();Publishing your Plugin on the Marketplace
In case you want to share your settings or your plugin with other Piwik users you can do this by pushing your plugin to a public GitHub repository and creating a tag. Easy as that. Read more about how to distribute a plugin.
Advanced features
Isn’t it easy to create settings for plugins ? We never even created a file ! The Settings API already offers many possibilities but it might not yet be as flexible as your use case requires. So let us know in case you are missing something and we hope to add this feature at some point in the future.
If you have any feedback regarding our APIs or our guides in the Developer Zone feel free to send it to us. -
How Media Analytics for Piwik gives you the insights you need to measure how effective your video and audio marketing is – Part 2
 2 février 2017, par InnoCraft — Community
In Part 1 we have covered some of the Media Analytics features and explained why you cannot afford to not measure the media usage on your website. Chances are, you are wasting or losing money and time by not making the most out of your marketing strategy this very second. In this part, we continue showing you some more insights you can expect to get from Media Analytics and how nicely it is integrated into Piwik.
Video, Audio and Media Player reports
Media Analytics adds several new reports around videos, audios and media players. They are all quite similar and give you similar insights so we will mainly focus on the Video Titles report.
Metrics
The above mentioned reports give you all the same insights and features so we will mainly focus on the “Video Titles” report. When you open such a report for the first time, you will see a report like this with the following metrics :

- “Impressions”, the number of times a visitor has viewed a page where this media was included.
- “Plays”, the number of times a visitor watched or listened to this media.
- “Play rate”, the percentage of visitors that watched or listened to a media after they have visited a page where this media was included.
- “Finishes”, the percentage of visitors who played a media and finished it.
- “Avg. time spent”, the average amount of time a visitor spent watching or listening to this media.
- “Avg. media length” the average length of a video or audio media file. This number may vary for example if the media is a stream.
- “Avg completion” the percentage of how much visitors have watched of a video.
If you are not sure what a certain metric means, simply hover the metric title in the UI and you will get a detailed explanation. By changing the visualization to the “All Columns Table” in the bottom of the report, you get to see even more metrics like “Plays by unique visitors”, “Impressions by unique visitors”, “Finish rate”, “Avg. time to play aka hesitation time”, “Fullscreen rate” and we are always adding more metrics.
These metrics are available for the following reports :
- “Video / Audio Titles” shows you all metrics aggregated by video or audio title
- “Video / Audio Resource URLs” shows you all metrics aggregated by the video or audio resource URL, for example “https://piwik.org/media.mp4”.
- “Video / Audio Resource URLs grouped” removes some information from the URLs like subdomain, file extensions and other information to get aggregated metrics when you provide the same media in different formats.
- “Videos per hour in website’s timezone” lets you find out how your media content is consumed depending on the hour of the day. You might realize that your media is consumed very differently in the morning vs at night.
- “Video Resolutions” lets you discover how your video is consumed depending on the resolution.
- “Media players” report is useful if you use different media players on your websites or apps and want to see how engagement with your media compares by media player.
Row evolution
At InnoCraft, we understand that static numbers are not so useful. When you see for example that yesterday 20 visitors played a certain media, would you know whether this is good or bad ? This is why we always give you the possibility to see the data in relation to the recorded data in the past. To see how a specific media performs over time, simply hover a media title or media resource URL and click on the “Row Evolution” icon.

Now you can see whether actually more or less visitors played your chosen video for the selected period. Simply click on any metric name and the chosen metrics will be plotted in the big evolution graph.
This feature is similar to the Media Overall evolution graph introduced in Part 1, but shows you a detailed evolution for an individual media title or resource.
Media details
Now that you know some of the most important media metrics, you might want to look a bit deeper into the user behaviour. For example we mentioned before the “Avg time spent on media” metric. Such an average number doesn’t let you know whether most visitors spent about the same time watching the video, or whether there were many more visitors that watched it only for a few seconds and a few that watched it for very long.
One of the ways to get this insight is by again hovering any media title or resource URL and clicking on the “Media details” icon. It will open a new popup showing you a new set of reports like these :

The “Time spent watching” and “How far visitors reached in the media” bar charts show you on the X-Axis how much time each visitor spent on watching a video and how far in the video they reached. On the Y-Axis you see the number of visitors. This lets you discover whether your users for example jump often to the middle or end of the video and which parts of your video was seen most often.

The “How often the media was watched in a certain hour” and “Which resolutions the media was watched” is similar to the reports introduced in Part 1 of the blog post. However, this time instead of showing aggregated video or audio content data, they display data for a specific media title or media resource URL.
Segmented audience log
In Part 1 we have already introduced the Audience Log and explained that it is useful to better understand the user behaviour. Just a quick recap : The Audience Log shows you chronologically every action a specific visitor has performed on your website : Which pages they viewed, how they interacted with your media, when they clicked somewhere, and much more.
By hovering a media title or a media resource and then selecting “Segmented audience log” you get to see the same log, but this time it will show only visitors that have interacted with the selected media. This will be useful for you for example when you notice an unusual value for a metric and then want to better understand why a metric is like that.

Applying segments
Media Analytics lets you apply any Piwik segment to the media reports allowing you to dice your visitors or personas multiplying the value that you get out of Media Analytics. For example you may want to apply a segment and analyze the media usage for visitors that have visited your website or mobile app for the first time vs. recurring visitors. Sometimes it may be interesting how visitors that converted a specific goal or purchased something consume your media, the possibilities are endless. We really recommend to take advantage of segments to understand your different target groups even better.
The plugin also adds a lot of new segments to your Piwik letting you segment any Piwik report by visitors that have viewed or interacted with your media. For example you could go to the “Visitors => Devices” report and apply a media segment to see which devices were used the most to view your media. You can also combine segments to see for example how often your goals were converted when a visitor viewed media for longer than 10 seconds after waiting for at least 20 seconds before playing your media and when they played at least 3 videos during their visit.
Widgets, Scheduled Reports, and more.
This is not where the fun ends. Media Analytics defines more than 15 new widgets that you can add to your dashboard or export it into a third party website. You can set up Scheduled Reports to receive the Media reports automatically via email or sms or download the report to share it with your colleagues. It works also very well with Custom Alerts and you can view the Media reports in the Piwik Mobile app for Android and iOS. Via the HTTP Reporting API you can fetch any report in various formats. The plugin is really nicely integrated into Piwik we would need some more blog posts to fully cover all the ways Media Analytics advances your Piwik experience and how you can use and dig into all the data to increase your conversions and sales.
How to get Media Analytics and related features
You can get Media Analytics on the Piwik Marketplace. If you want to learn more about this feature, you might be also interested in the Media Analytics User Guide and the Media Analytics FAQ.
-
Progressive or Interlaced misinterpreted when transcoding to DNxHD mxf with ffmpeg
19 avril 2015, par OlleHi, don’t know if i am doing it wrong or is there a bug.
Trying to transcode 1080i Video from Quicktime Animation interlaced upper field with a stereo audio to MXF, DNxHD with discreet mono audio channels and video interlaced.
DNxHD = VC-3 op1a 120M.Everything works as a charm except for the end result is being tagged as Progressive ! I can see, when i look at the video, that it is interlaced and good looking, so everything is in order.
But the MXF file is identifying it self as a Progressive video, so our asset management system treat it as a progressive file 1080p and so does the Avid Mediacomposers.
I can’t se the problem with ffprobe but i can in MediaInfo v0.7.69
Se below.Command that i run :
./ffmpeg -i OLLETEST_MANSZELM_ANIMATION.mov -timecode 10:00:00:00 -threads 16 -map 0:0 -map 0:1 -map 0:1 -map_channel 0.1.0:0.1 -map_channel 0.1.1:0.2 -vcodec dnxhd -b:v 120M -acodec pcm_s24le -ar 48000 -flags +ildct -y test.mxfThe transcoded file run with media info reports this strange result.
Scan type                                : Progressive

Original scan type                       : Interlaced

Original scan order                      : Top Field First
seems as
-flags +ildctdon’t affect Scan type :The output from ffmpeg :
Olles-MacBook-Pro-2:NoBackUp olso$ ./ffmpeg -i OLLETEST_MANSZELM_ANIMATION.mov -timecode 00:10:00:00 -threads 16 -map 0:0 -map 0:1 -map 0:1 -map_channel 0.1.0:0.1 -map_channel 0.1.1:0.2 -vcodec dnxhd -b:v 120M -acodec pcm_s24le -ar 48000  -flags +ildct -y test.mxf

ffmpeg version 2.6.2-tessus Copyright (c) 2000-2015 the FFmpeg developers

  built with Apple LLVM version 6.0 (clang-600.0.57) (based on LLVM 3.5svn)

  configuration: --cc=/usr/bin/clang --prefix=/Users/helmutt/data/ext/ffmpeg/sw --as=yasm --extra-version=tessus --disable-shared --enable-static --disable-ffplay --enable-gpl --enable-pthreads --enable-postproc --enable-libmp3lame --enable-libtheora --enable-libvorbis --enable-libx264 --enable-libx265 --enable-libxvid --enable-libspeex --enable-bzlib --enable-zlib --enable-libopencore-amrnb --enable-libopencore-amrwb --enable-libxavs --enable-libsoxr --enable-libwavpack --enable-version3 --enable-libvo-aacenc --enable-libvo-amrwbenc --enable-libvpx --enable-libgsm --enable-libopus --enable-libmodplug --enable-fontconfig --enable-libfreetype --enable-libass --enable-libbluray --enable-filters --disable-indev=qtkit --disable-indev=x11grab_xcb --enable-runtime-cpudetect

  libavutil      54. 20.100 / 54. 20.100

  libavcodec     56. 26.100 / 56. 26.100

  libavformat    56. 25.101 / 56. 25.101

  libavdevice    56.  4.100 / 56.  4.100

  libavfilter     5. 11.102 /  5. 11.102

  libswscale      3.  1.101 /  3.  1.101

  libswresample   1.  1.100 /  1.  1.100

  libpostproc    53.  3.100 / 53.  3.100

Input #0, mov,mp4,m4a,3gp,3g2,mj2, from 'OLLETEST_MANSZELM_ANIMATION.mov':

  Metadata:

    major_brand     : qt

    minor_version   : 537199360

    compatible_brands: qt

    creation_time   : 2015-04-14 20:40:41

  Duration: 00:00:11.04, start: 0.000000, bitrate: 1141927 kb/s

    Stream #0:0(eng): Video: qtrle (rle  / 0x20656C72), rgb24, 1920x1080, 1140363 kb/s, SAR 1:1 DAR 16:9, 25 fps, 25 tbr, 25 tbn, 25 tbc (default)

    Metadata:

      creation_time   : 2015-04-14 20:40:41

      handler_name    : Apple Alias Data Handler

      encoder         : Animation

      timecode        : 00:00:00:00

    Stream #0:1(eng): Audio: pcm_s16le (sowt / 0x74776F73), 48000 Hz, stereo, s16, 1536 kb/s (default)

    Metadata:

      creation_time   : 2015-04-14 20:40:41

      handler_name    : Apple Alias Data Handler

      timecode        : 00:00:00:00

    Stream #0:2(eng): Data: none (tmcd / 0x64636D74), 0 kb/s (default)

    Metadata:

      creation_time   : 2015-04-14 20:41:01

      handler_name    : Apple Alias Data Handler

      timecode        : 00:00:00:00

-map_channel is forwarded to lavfi similarly to -af pan=0x4:c0=c0.

[pan @ 0x7f9db1e02600] This syntax is deprecated. Use '|' to separate the list items.

[pan @ 0x7f9db1e02600] Pure channel mapping detected: 0

-map_channel is forwarded to lavfi similarly to -af pan=0x4:c0=c1.

[pan @ 0x7f9db1d241e0] This syntax is deprecated. Use '|' to separate the list items.

[pan @ 0x7f9db1d241e0] Pure channel mapping detected: 1

Output #0, mxf, to 'test.mxf':

  Metadata:

    major_brand     : qt

    minor_version   : 537199360

    compatible_brands: qt

    timecode        : 00:10:00:00

    encoder         : Lavf56.25.101

    Stream #0:0(eng): Video: dnxhd, yuv422p, 1920x1080 [SAR 1:1 DAR 16:9], q=2-1024, 120000 kb/s, 25 fps, 25 tbn, 25 tbc (default)

    Metadata:

      creation_time   : 2015-04-14 20:40:41

      handler_name    : Apple Alias Data Handler

      timecode        : 00:00:00:00

      encoder         : Lavc56.26.100 dnxhd

    Stream #0:1(eng): Audio: pcm_s24le, 48000 Hz, mono, s32, 1152 kb/s (default)

    Metadata:

      creation_time   : 2015-04-14 20:40:41

      handler_name    : Apple Alias Data Handler

      timecode        : 00:00:00:00

      encoder         : Lavc56.26.100 pcm_s24le

    Stream #0:2(eng): Audio: pcm_s24le, 48000 Hz, mono, s32, 1152 kb/s (default)

    Metadata:

      creation_time   : 2015-04-14 20:40:41

      handler_name    : Apple Alias Data Handler

      timecode        : 00:00:00:00

      encoder         : Lavc56.26.100 pcm_s24le

Stream mapping:

  Stream #0:0 -> #0:0 (qtrle (native) -> dnxhd (native))

  Stream #0:1 -> #0:1 (pcm_s16le (native) -> pcm_s24le (native))

  Stream #0:1 -> #0:2 (pcm_s16le (native) -> pcm_s24le (native))

Press [q] to stop, [?] for help

[mxf @ 0x7f9db2806c00] -d10_channelcount requires MXF D-10 and will be ignored/s

    Last message repeated 1 times

frame=  276 fps= 26 q=1.0 Lsize=  166981kB time=00:00:11.20 bitrate=122134.7kbits/s

video:163392kB audio:3150kB subtitle:0kB other streams:0kB global headers:0kB muxing overhead: 0.263624%
Complete output from mediainfo.
General

Complete name                            : /NoBackUp/test.mxf

Format                                   : MXF

Format profile                           : OP-1a

Format settings                          : Closed / Complete

File size                                : 163 MiB

Duration                                 : 11s 40ms

Overall bit rate                         : 124 Mbps

Encoded date                             : 0-00-00 00:00:00.000

Writing application                      : FFmpeg OP1a Muxer 56.25.101

Writing library                          : FFmpeg OP1a Muxer 56.25.101


Video

ID                                       : 2

Format                                   : VC-3

Format_Settings_Wrapping                 : Frame

Codec ID                                 : 0D01030102110100-0401020271080000

Duration                                 : 11s 40ms

Bit rate mode                            : Constant

Bit rate                                 : 121 Mbps

Width                                    : 1 920 pixels

Height                                   : 1 080 pixels

Display aspect ratio                     : 16:9

Frame rate                               : 25.000 fps

Color space                              : YUV

Chroma subsampling                       : 4:2:2

Bit depth                                : 8 bits

Scan type                                : Progressive

Original scan type                       : Interlaced

Original scan order                      : Top Field First

Bits/(Pixel*Frame)                       : 2.339

Stream size                              : 160 MiB (98%)


Audio #1

ID                                       : 3

Format                                   : PCM

Format settings, Endianness              : Little

Format_Settings_Wrapping                 : Frame (AES)

Codec ID                                 : 0D01030102060300

Duration                                 : 11s 40ms

Bit rate mode                            : Constant

Bit rate                                 : 1 152 Kbps

Channel(s)                               : 1 channel

Sampling rate                            : 48.0 KHz

Bit depth                                : 24 bits

Stream size                              : 1.52 MiB (1%)


Audio #2

ID                                       : 4

Format                                   : PCM

Format settings, Endianness              : Little

Format_Settings_Wrapping                 : Frame (AES)

Codec ID                                 : 0D01030102060300

Duration                                 : 11s 40ms

Bit rate mode                            : Constant

Bit rate                                 : 1 152 Kbps

Channel(s)                               : 1 channel

Sampling rate                            : 48.0 KHz

Bit depth                                : 24 bits

Stream size                              : 1.52 MiB (1%)


Other #1

ID                                       : 1

Type                                     : Time code

Format                                   : MXF TC

Time code of first frame                 : 00:10:00:00

Time code settings                       : Striped


Other #2

Type                                     : Time code

Format                                   : SMPTE TC

Muxing mode                              : SDTI

Time code of first frame                 : 00:10:00:00