Recherche avancée
Médias (1)
-

Rennes Emotion Map 2010-11
19 octobre 2011, par
Mis à jour : Juillet 2013
Langue : français
Type : Texte
Autres articles (101)
-
Publier sur MédiaSpip
13 juin 2013Puis-je poster des contenus à partir d’une tablette Ipad ?
Oui, si votre Médiaspip installé est à la version 0.2 ou supérieure. Contacter au besoin l’administrateur de votre MédiaSpip pour le savoir -
Les autorisations surchargées par les plugins
27 avril 2010, parMediaspip core
autoriser_auteur_modifier() afin que les visiteurs soient capables de modifier leurs informations sur la page d’auteurs -
Soumettre bugs et patchs
10 avril 2011Un logiciel n’est malheureusement jamais parfait...
Si vous pensez avoir mis la main sur un bug, reportez le dans notre système de tickets en prenant bien soin de nous remonter certaines informations pertinentes : le type de navigateur et sa version exacte avec lequel vous avez l’anomalie ; une explication la plus précise possible du problème rencontré ; si possibles les étapes pour reproduire le problème ; un lien vers le site / la page en question ;
Si vous pensez avoir résolu vous même le bug (...)
Sur d’autres sites (7921)
-
Getting message -> Invalid data found when processing input
19 novembre 2012, par user1726619I want to use ffmpeg lib in my library.For that purpose,i have successfully compiled it.But when i try to execute any command,i am getting this message :
Invalid data found when processing input.I don't know whats the reason behind it.This is the code :
public class Videokit extends Activity {

    String FilePath;

    String OutPut;

    Context mycontext;

    Videokit vk ;

    static

    {

        System.loadLibrary("videokit");

    }


    public native void run(String[] args);


    public void onCreate(Bundle savedInstanceState) {

        super.onCreate(savedInstanceState);

        setContentView(R.layout.main);

        FilePath =Environment.getExternalStorageDirectory().toString()+"/output.3gp";

        try {

            ffmpegrun();

        } catch (IOException e) {

            // TODO Auto-generated catch block

            e.printStackTrace();

        }

    }


    public String ffmpegrun() throws IOException

    {

        boolean success=false;

        File folder = new File(Environment.getExternalStorageDirectory().toString() + "/image-%3d.jpeg");

        File file = new File(FilePath);

        System.out.println("filepath exists at:"+file.getAbsolutePath());

        if (!folder.exists()) {

            success = folder.mkdirs();

//              Toast.makeText(mycontext,"outfile.mp4 exists at"+folder.getAbsolutePath(),Toast.LENGTH_LONG).show();

             OutPut = folder.getAbsolutePath();

        }

        System.out.println("outfile.flv exists at:"+folder.getAbsolutePath());

        run(new String[]{

                "ffmpeg",

                "-i",

                FilePath,

                "-r 1",

                 "-f",

                 "image2",

                 "image-%3d.jpeg"

        });

        return OutPut;

    }

}
This is the log :
10-07 17:00:03.707: D/dalvikvm(8760): Trying to load lib /data/data/uk.co.halfninja.videokit/lib/libvideokit.so 0x44e8c958

10-07 17:00:03.837: D/dalvikvm(8760): Added shared lib /data/data/uk.co.halfninja.videokit/lib/libvideokit.so 0x44e8c958

10-07 17:00:03.837: I/Videokit(8760): Loading native library compiled at 13:52:27 Oct  7 2012

10-07 17:00:03.917: I/System.out(8760): filepath exists at:/sdcard/output.3gp

10-07 17:00:03.917: I/System.out(8760): outfile.flv exists at:/sdcard/image-%3d.jpeg

10-07 17:00:03.917: D/dalvikvm(8760): +++ not scanning '/system/lib/libwebcore.so' for 'run' (wrong CL)

10-07 17:00:03.917: D/dalvikvm(8760): +++ not scanning '/system/lib/libmedia_jni.so' for 'run' (wrong CL)

10-07 17:00:03.928: D/dalvikvm(8760): +++ not scanning '/system/lib/libexif.so' for 'run' (wrong CL)

10-07 17:00:03.928: D/Videokit(8760): run() called

10-07 17:00:03.928: D/Videokit(8760): run passing off to main()

10-07 17:00:03.928: D/Videokit(8760): main(): registering all modules

10-07 17:00:03.938: D/Videokit(8760): main(): registered everything

10-07 17:00:03.938: D/Videokit(8760): main(): initting opts

10-07 17:00:03.968: D/Videokit(8760): main(): initted opts.

10-07 17:00:03.968: E/Videokit(8760): ffmpeg version N-30996-gf925b24, Copyright (c) 2000-2011 the FFmpeg developers

10-07 17:00:03.979: E/Videokit(8760):   built on Oct  7 2012 13:52:32 with gcc 4.4.3

10-07 17:00:03.979: E/Videokit(8760):   configuration: --enable-cross-compile --arch=arm5te --enable-armv5te --target-os=linux --disable-stripping --prefix=../output --disable-neon --enable-version3 --disable-shared --enable-static --enable-gpl --enable-memalign-hack --cc=arm-linux-androideabi-gcc --ld=arm-linux-androideabi-ld --extra-cflags='-fPIC -DANDROID -D__thumb__ -mthumb -Wfatal-errors -Wno-deprecated' --disable-everything --enable-decoder=mjpeg --enable-demuxer=mjpeg --enable-parser=mjpeg --enable-demuxer=image2 --enable-muxer=mp4 --enable-encoder=libx264 --enable-libx264 --enable-decoder=rawvideo --enable-protocol=file --enable-hwaccels --disable-ffmpeg --disable-ffplay --disable-ffprobe --disable-ffserver --disable-network --enable-filter=buffer --enable-filter=buffersink --disable-demuxer=v4l --disable-demuxer=v4l2 --disable-indev=v4l --disable-indev=v4l2 --extra-cflags='-I../x264 -Ivideokit' --extra-ldflags=-L../x264

10-07 17:00:03.987: D/Videokit(8760): main(): parsing options

10-07 17:00:03.987: D/Videokit(8760): parse_options has 7 options to parse

10-07 17:00:04.050: E/Videokit(8760): /sdcard/output.3gp: Invalid data found when processing input

10-07 17:00:04.050: E/Videokit(8760): ffmpeg_exit(1) called!
Please help me.I am clueless about this problem.Thanks in advance.
-
How to make your plugin configurable – Introducing the Piwik Platform
18 septembre 2014, par Thomas Steur — DevelopmentThis is the next post of our blog series where we introduce the capabilities of the Piwik platform (our previous post was How to add new pages and menu items to Piwik). This time you will learn how to define settings for your plugin. For this tutorial you will need to have basic knowledge of PHP.
What can I do with settings ?
The Settings API offers you a simple way to make your plugin configurable within the Admin interface of Piwik without having to deal with HTML, JavaScript, CSS or CSRF tokens. There are many things you can do with settings, for instance let users configure :
- connection infos to a third party system such as a WordPress installation.
- select a metric to be displayed in your widget
- select a refresh interval for your widget
- which menu items, reports or widgets should be displayed
- and much more
Getting started
In this series of posts, we assume that you have already set up your development environment. If not, visit the Piwik Developer Zone where you’ll find the tutorial Setting up Piwik.
To summarize the things you have to do to get setup :
- Install Piwik (for instance via git).
- Activate the developer mode :
./console development:enable --full. - Generate a plugin :
./console generate:plugin --name="MySettingsPlugin". There should now be a folderplugins/MySettingsPlugin. - And activate the created plugin under Settings => Plugins.
Let’s start creating settings
We start by using the Piwik Console to create a settings template :
./console generate:settingsThe command will ask you to enter the name of the plugin the settings should belong to. I will simply use the above chosen plugin name “MySettingsPlugin”. There should now be a file
plugins/MySettingsPlugin/Settings.phpwhich contains already some examples to get you started easily. To see the settings in action go to Settings => Plugin settings in your Piwik installation.
Adding one or more settings
Settings are added in the
init()method of the settings class by calling the methodaddSetting()and passing an instance of a UserSetting or SystemSetting object. How to create a setting is explained in the next chapter.Customising a setting
To create a setting you have to define a name along some options. For instance which input field should be displayed, what type of value you expect, a validator and more. Depending on the input field we might automatically validate the values for you. For example if you define available values for a select field then we make sure to validate and store only a valid value which provides good security out of the box.
For a list of possible properties have a look at the SystemSetting and UserSetting API reference.
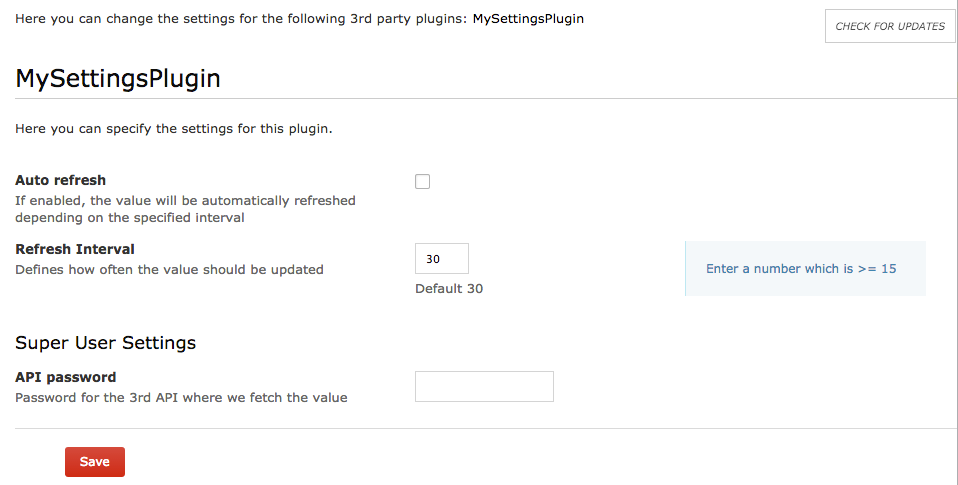
class Settings extends \Piwik\Plugin\Settings

{

    public $refreshInterval;


    protected function init()

    {

        $this->setIntroduction('Here you can specify the settings for this plugin.');


        $this->createRefreshIntervalSetting();

    }


    private function createRefreshIntervalSetting()

    {

        $this->refreshInterval = new UserSetting('refreshInterval', 'Refresh Interval');

        $this->refreshInterval->type = static::TYPE_INT;

        $this->refreshInterval->uiControlType = static::CONTROL_TEXT;

        $this->refreshInterval->uiControlAttributes = array('size' => 3);

        $this->refreshInterval->description = 'How often the value should be updated';

        $this->refreshInterval->inlineHelp = 'Enter a number which is >= 15';

        $this->refreshInterval->defaultValue = '30';

        $this->refreshInterval->validate = function ($value, $setting) {

            if ($value < 15) {

                throw new \Exception('Value is invalid');

            }

        };


        $this->addSetting($this->refreshInterval);

    }

}
In this example you can see some of those properties. Here we create a setting named “refreshInterval” with the display name “Refresh Interval”. We want the setting value to be an integer and the user should enter this value in a text input field having the size 3. There is a description, an inline help and a default value of 30. The validate function makes sure to accept only integers that are at least 15, otherwise an error in the UI will be shown.

You do not always have to specify a PHP
typeand auiControlType. For instance if you specify a PHP type boolean we automatically display a checkbox by default. Similarly if you specify to display a checkbox we assume that you want a boolean value.Accessing settings values
You can access the value of a setting in a widget, in a controller, in a report or anywhere you want. To access the value create an instance of your settings class and get the value like this :
$settings = new Settings();

$interval = $settings->refreshInterval->getValue()
Type of settings
The Piwik platform differentiates between UserSetting and SystemSetting. User settings can be configured by any logged in user and each user can configure the setting independently. The Piwik platform makes sure that settings are stored per user and that a user cannot see another users configuration.
A system setting applies to all of your users. It can be configured only by a user who has super user access. By default, the value can be read only by a super user as well but often you want to have it readable by anyone or at least by logged in users. If you set a setting readable the value will still be only displayed to super users but you will always be able to access the value in the background.
Imagine you are building a widget that fetches data from a third party system where you need to configure an API URL and token. While no regular user should see the value of both settings, the value should still be readable by any logged in user. Otherwise when logged in users cannot read the setting value then the data cannot be fetched in the background when this user wants to see the content of the widget. Solve this by making the setting readable by the current user :
$setting->readableByCurrentUser = !Piwik::isUserIsAnonymous();Publishing your Plugin on the Marketplace
In case you want to share your settings or your plugin with other Piwik users you can do this by pushing your plugin to a public GitHub repository and creating a tag. Easy as that. Read more about how to distribute a plugin.
Advanced features
Isn’t it easy to create settings for plugins ? We never even created a file ! The Settings API already offers many possibilities but it might not yet be as flexible as your use case requires. So let us know in case you are missing something and we hope to add this feature at some point in the future.
If you have any feedback regarding our APIs or our guides in the Developer Zone feel free to send it to us. -
How to make your plugin configurable – Introducing the Piwik Platform
18 septembre 2014, par Thomas Steur — DevelopmentThis is the next post of our blog series where we introduce the capabilities of the Piwik platform (our previous post was How to add new pages and menu items to Piwik). This time you will learn how to define settings for your plugin. For this tutorial you will need to have basic knowledge of PHP.
What can I do with settings ?
The Settings API offers you a simple way to make your plugin configurable within the Admin interface of Piwik without having to deal with HTML, JavaScript, CSS or CSRF tokens. There are many things you can do with settings, for instance let users configure :
- connection infos to a third party system such as a WordPress installation.
- select a metric to be displayed in your widget
- select a refresh interval for your widget
- which menu items, reports or widgets should be displayed
- and much more
Getting started
In this series of posts, we assume that you have already set up your development environment. If not, visit the Piwik Developer Zone where you’ll find the tutorial Setting up Piwik.
To summarize the things you have to do to get setup :
- Install Piwik (for instance via git).
- Activate the developer mode :
./console development:enable --full. - Generate a plugin :
./console generate:plugin --name="MySettingsPlugin". There should now be a folderplugins/MySettingsPlugin. - And activate the created plugin under Settings => Plugins.
Let’s start creating settings
We start by using the Piwik Console to create a settings template :
./console generate:settingsThe command will ask you to enter the name of the plugin the settings should belong to. I will simply use the above chosen plugin name “MySettingsPlugin”. There should now be a file
plugins/MySettingsPlugin/Settings.phpwhich contains already some examples to get you started easily. To see the settings in action go to Settings => Plugin settings in your Piwik installation.Adding one or more settings
Settings are added in the
init()method of the settings class by calling the methodaddSetting()and passing an instance of a UserSetting or SystemSetting object. How to create a setting is explained in the next chapter.Customising a setting
To create a setting you have to define a name along some options. For instance which input field should be displayed, what type of value you expect, a validator and more. Depending on the input field we might automatically validate the values for you. For example if you define available values for a select field then we make sure to validate and store only a valid value which provides good security out of the box.
For a list of possible properties have a look at the SystemSetting and UserSetting API reference.
class Settings extends \Piwik\Plugin\Settings

{

    public $refreshInterval;


    protected function init()

    {

        $this->setIntroduction('Here you can specify the settings for this plugin.');


        $this->createRefreshIntervalSetting();

    }


    private function createRefreshIntervalSetting()

    {

        $this->refreshInterval = new UserSetting('refreshInterval', 'Refresh Interval');

        $this->refreshInterval->type = static::TYPE_INT;

        $this->refreshInterval->uiControlType = static::CONTROL_TEXT;

        $this->refreshInterval->uiControlAttributes = array('size' => 3);

        $this->refreshInterval->description = 'How often the value should be updated';

        $this->refreshInterval->inlineHelp = 'Enter a number which is >= 15';

        $this->refreshInterval->defaultValue = '30';

        $this->refreshInterval->validate = function ($value, $setting) {

            if ($value < 15) {

                throw new \Exception('Value is invalid');

            }

        };


        $this->addSetting($this->refreshInterval);

    }

}
In this example you can see some of those properties. Here we create a setting named “refreshInterval” with the display name “Refresh Interval”. We want the setting value to be an integer and the user should enter this value in a text input field having the size 3. There is a description, an inline help and a default value of 30. The validate function makes sure to accept only integers that are at least 15, otherwise an error in the UI will be shown.
You do not always have to specify a PHP
typeand auiControlType. For instance if you specify a PHP type boolean we automatically display a checkbox by default. Similarly if you specify to display a checkbox we assume that you want a boolean value.Accessing settings values
You can access the value of a setting in a widget, in a controller, in a report or anywhere you want. To access the value create an instance of your settings class and get the value like this :
$settings = new Settings();

$interval = $settings->refreshInterval->getValue()
Type of settings
The Piwik platform differentiates between UserSetting and SystemSetting. User settings can be configured by any logged in user and each user can configure the setting independently. The Piwik platform makes sure that settings are stored per user and that a user cannot see another users configuration.
A system setting applies to all of your users. It can be configured only by a user who has super user access. By default, the value can be read only by a super user as well but often you want to have it readable by anyone or at least by logged in users. If you set a setting readable the value will still be only displayed to super users but you will always be able to access the value in the background.
Imagine you are building a widget that fetches data from a third party system where you need to configure an API URL and token. While no regular user should see the value of both settings, the value should still be readable by any logged in user. Otherwise when logged in users cannot read the setting value then the data cannot be fetched in the background when this user wants to see the content of the widget. Solve this by making the setting readable by the current user :
$setting->readableByCurrentUser = !Piwik::isUserIsAnonymous();Publishing your Plugin on the Marketplace
In case you want to share your settings or your plugin with other Piwik users you can do this by pushing your plugin to a public GitHub repository and creating a tag. Easy as that. Read more about how to distribute a plugin.
Advanced features
Isn’t it easy to create settings for plugins ? We never even created a file ! The Settings API already offers many possibilities but it might not yet be as flexible as your use case requires. So let us know in case you are missing something and we hope to add this feature at some point in the future.
If you have any feedback regarding our APIs or our guides in the Developer Zone feel free to send it to us.