Recherche avancée
Autres articles (39)
-
Les vidéos
21 avril 2011, parComme les documents de type "audio", Mediaspip affiche dans la mesure du possible les vidéos grâce à la balise html5 .
Un des inconvénients de cette balise est qu’elle n’est pas reconnue correctement par certains navigateurs (Internet Explorer pour ne pas le nommer) et que chaque navigateur ne gère en natif que certains formats de vidéos.
Son avantage principal quant à lui est de bénéficier de la prise en charge native de vidéos dans les navigateur et donc de se passer de l’utilisation de Flash et (...) -
MediaSPIP v0.2
21 juin 2013, parMediaSPIP 0.2 est la première version de MediaSPIP stable.
Sa date de sortie officielle est le 21 juin 2013 et est annoncée ici.
Le fichier zip ici présent contient uniquement les sources de MediaSPIP en version standalone.
Comme pour la version précédente, il est nécessaire d’installer manuellement l’ensemble des dépendances logicielles sur le serveur.
Si vous souhaitez utiliser cette archive pour une installation en mode ferme, il vous faudra également procéder à d’autres modifications (...) -
Mise à disposition des fichiers
14 avril 2011, parPar défaut, lors de son initialisation, MediaSPIP ne permet pas aux visiteurs de télécharger les fichiers qu’ils soient originaux ou le résultat de leur transformation ou encodage. Il permet uniquement de les visualiser.
Cependant, il est possible et facile d’autoriser les visiteurs à avoir accès à ces documents et ce sous différentes formes.
Tout cela se passe dans la page de configuration du squelette. Il vous faut aller dans l’espace d’administration du canal, et choisir dans la navigation (...)
Sur d’autres sites (6964)
-
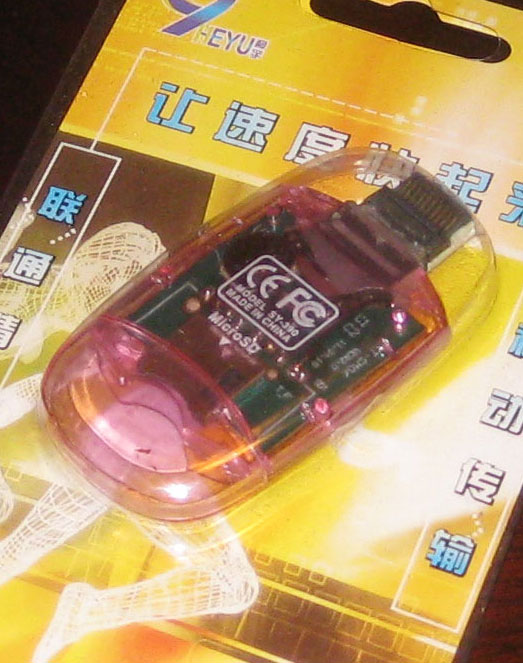
Dreamcast SD Adapter and DreamShell
31 décembre 2014, par Multimedia Mike — Sega DreamcastNope ! I’m never going to let go of the Sega Dreamcast hacking. When I was playing around with Dreamcast hacking early last year, I became aware that there is such a thing as an SD card adapter for the DC that plugs into the port normally reserved for the odd DC link cable. Of course I wanted to see what I could do with it.
The primary software that leverages the DC SD adapter is called DreamShell. Working with this adapter and the software requires some skill and guesswork. Searching for these topics tends to turn up results from various forums where people are trying to cargo-cult their way to solutions. I have a strange feeling that this post might become the unofficial English-language documentation on the matter.
Use Cases
What can you do with this thing ? Undoubtedly, the primary use is for backing up (ripping) the contents of GD-ROMs (the custom optical format used for the DC) and playing those backed up (ripped) copies. Presumably, users of this device leverage the latter use case more than the former, i.e., download ripped games, load them on the SD card, and launch them using DreamShell.However, there are other uses such as multimedia playback, system exploration, BIOS reprogramming, high-level programming, and probably a few other things I haven’t figured out yet.
Delivery
I put in an order via the dc-sd.com website and in about 2 short months, the item arrived from China. This marked my third lifetime delivery from China and curiously, all 3 of the shipments have pertained to the Sega Dreamcast.

Click for larger image
I thought it was very interesting that this adapter came in such complete packaging. The text is all in Chinese, though the back states “Windows 98 / ME / 2000 / XP, Mac OS 9.1, LINUX2.4”. That’s what tipped me off that they must have just cannibalized some old USB SD card readers and packaging in order to create these. Closer inspection of the internals through the translucent pink case confirms this.
Usage
According to its change log, DreamShell has been around for a long time with version 1.0.0 released in February of 2004. The current version is 4.0.0 RC3. There are several downloads available :- DreamShell 4.0 RC 3 CDI Image
- DreamShell 4.0 RC 3 + Boot Loader
- DreamShell 4.0 RC 3 + Core CDI image
Option #2 worked for me. It contains a CDI disc image and the DreamShell files in a directory named DS/.
Burn the CDI to a CD-R in the normal way you would burn a bootable Dreamcast disc from a CDI image. This is open-ended and left as an exercise to the reader, since there are many procedures depending on platform. On Linux, I used a small script I found once called burncdi-dc.sh.
Then, copy the contents of the DS/ folder to an SD card. As for filesystem, FAT16 and FAT32 are both known to work. The files in DS/ should land in the root of the SD card ; the folder DS/ should not be in the root.
Plug the SD card into the DC SD adapter and plug the adapter in the link cable port on the back of the Dreamcast. Then, boot the disc. If it works, you will see this minor corruption of the usual Sega licensing screen :

Then, there will be a brief white-on-black text screen that explains the booting process :

Then, there will be the main DreamShell logo :

Finally, you will land on the DreamShell main desktop :

Skepticism
At first, I was supremely skeptical of the idea that this SD adapter could perform speedily enough to play games reasonably. This was predicated on the observation that my DC coder’s cable that I used to use for homebrew development could not transfer faster than 115200 bits/second, amounting to about 11 kbytes/sec. I assumed that this was a fundamental limitation of the link port.In fact, I ripped a few of my Dreamcast discs over a decade ago and still have those rips lying around. So I copied the ISO image of Resident Evil : Code Veronica — the game I personally played most on the DC — to the SD card (anywhere works) and used the “ISO loader” icon seen on the desktop above to launch the game.
It works :

The opening FMV plays at full speed. Everything loads as fast as I remember. I was quite surprised.
Digression : My assumptions about serial speeds have often been mistaken. 10 years ago, I heard stories about how we would soon be able to watch streaming video on our cell phones. I scoffed because I thought the 56K limitation of dialup modems was some sort of fundamental speed-of-light type of limitation for telephony bandwidth, wired or wireless.
The desktop menu also includes a ‘speedtest’ tool that profiles the write and read performance of your preferred storage medium. For my fastest SD card (a PNY 2 GB card) :

This is probably more representative of the true adapter bandwidth as reading and writing is a good deal faster through more modern interfaces on PC and Mac with this same card.
Look at the other options on the speedtest console. Hard drive ? Apparently, it’s possible, but it requires a good deal more hardware hacking than just purchasing this SD adapter.
Ripping
As you can see from the Resident Evil screenshot, playing games works quite nicely. How about ripping ? I’m pleased to say that DreamShell has a beautiful ripping interface :

Enter a name for the disc (or read the disc label), select the storage medium, and let it, well, rip. It indicates which track it’s working on and the Sega logo acts as a progress bar, shading blue as the track rip progresses.
I’m finally, efficiently, archiving that collection of Sega Dreamcast demo discs ; I’m hoping they’ll eventually find a home at the Internet Archive. How is overall ripping performance ? Usually about 38-40 minutes to rip a full 900-1000 MB. That certainly beats the 27-28 hours that were required when I performed the ripping at 11 kbytes/sec via the DC coders cable.
All is well until I get a sector reading error :

That’s when it can come in handy to have 3 DC consoles (see ?! not crazy !).
Other Uses
There’s a file explorer. You can browse the filesystem of the SD card, visual memory unit, or the CD portion of the GD-ROM (would be more useful if it accessed the GD area). There are FFmpeg files included. So I threw a random Cinepak file and random MPEG-1 file at it to see what happens. MPEG-1 didn’t do anything, but this Cinepak file from some Sierra game played handily :

If you must enter strings, it helps to have a Dreamcast keyboard (which I do). Failing that, here’s a glimpse of the onscreen keyboard that DreamShell equips :

Learning to use it is a game in itself.
There is an option of installing DreamShell in the BIOS. I did not attempt this. I don’t know if it’s possible (not like there’s a lot of documentation)– perhaps a custom BIOS modchip is needed. But here’s what the screen looks like :

There is also a plain console to interact with (better have a physical keyboard). There are numerous file manipulation commands and custom system interaction commands. I see one interesting command called ‘addr’ that looks useful for dumping memory regions to a file.
A Lua language interpreter is also built in. I would love to play with this if I could ascertain whether DreamShell provided Dreamcast-specific APIs.
Tips And Troubleshooting
I have 3 Dreamcast consoles, affectionately named Terran, Protoss, and Zerg after the StarCraft II stickers with which they are adorned. Some seem to work better than others. Protoss seemed to be able to boot the DreamShell disc more reliably than the others. However, I was alarmed when it couldn’t boot one morning when it was churning the previous day.I think the problem is that it was just cold. That seemed to be the issue. I put in a normal GD-ROM and let it warm up on that disc for awhile and then DreamShell booted fine. So that’s my piece of cargo-culting troubleshooting advice.
-
How to get .mp4 videos from motion on a Raspberry Pi ?
9 octobre 2016, par MaartiI use motion on my laptop and it works perfectly in any format. But when I use it on my Raspberry Pi 3 (Raspbian Jessie) with the Raspberry Camera V2, the only formats that work are :
.aviand.swf.When I choose any other format, the output video is a "0 sec video" that is played and closed instantly.
I would like to have
.mp4or.oggoutput so I can read it easily with HTML5.Here is the motion codec documentation.
Here is my config file :
############################################################

# Daemon

############################################################


# Start in daemon (background) mode and release terminal (default: off)

daemon on


# File to store the process ID, also called pid file. (default: not defined)

process_id_file /var/run/motion/motion.pid


############################################################

# Basic Setup Mode

############################################################


# Start in Setup-Mode, daemon disabled. (default: off)

setup_mode off


# Use a file to save logs messages, if not defined stderr and syslog is used. (default: not defined)

#logfile /mnt/camshare/Cam1/motion.log

logfile /tmp/motion.log


# Level of log messages [1..9] (EMR, ALR, CRT, ERR, WRN, NTC, INF, DBG, ALL). (default: 6 / NTC)

log_level 2


# Filter to log messages by type (COR, STR, ENC, NET, DBL, EVT, TRK, VID, ALL). (default: ALL)

log_type all


###########################################################

# Capture device options

############################################################


# Videodevice to be used for capturing  (default /dev/video0)

# for FreeBSD default is /dev/bktr0

#videodevice /dev/video0


# v4l2_palette allows to choose preferable palette to be use by motion

# to capture from those supported by your videodevice. (default: 17)

# E.g. if your videodevice supports both V4L2_PIX_FMT_SBGGR8 and

# V4L2_PIX_FMT_MJPEG then motion will by default use V4L2_PIX_FMT_MJPEG.

# Setting v4l2_palette to 2 forces motion to use V4L2_PIX_FMT_SBGGR8

# instead.

#

# Values :

# V4L2_PIX_FMT_SN9C10X : 0  'S910'

# V4L2_PIX_FMT_SBGGR16 : 1  'BYR2'

# V4L2_PIX_FMT_SBGGR8  : 2  'BA81'

# V4L2_PIX_FMT_SPCA561 : 3  'S561'

# V4L2_PIX_FMT_SGBRG8  : 4  'GBRG'

# V4L2_PIX_FMT_SGRBG8  : 5  'GRBG'

# V4L2_PIX_FMT_PAC207  : 6  'P207'

# V4L2_PIX_FMT_PJPG    : 7  'PJPG'

# V4L2_PIX_FMT_MJPEG   : 8  'MJPEG'

# V4L2_PIX_FMT_JPEG    : 9  'JPEG'

# V4L2_PIX_FMT_RGB24   : 10 'RGB3'

# V4L2_PIX_FMT_SPCA501 : 11 'S501'

# V4L2_PIX_FMT_SPCA505 : 12 'S505'

# V4L2_PIX_FMT_SPCA508 : 13 'S508'

# V4L2_PIX_FMT_UYVY    : 14 'UYVY'

# V4L2_PIX_FMT_YUYV    : 15 'YUYV'

# V4L2_PIX_FMT_YUV422P : 16 '422P'

# V4L2_PIX_FMT_YUV420  : 17 'YU12'

#

v4l2_palette 7


# Tuner device to be used for capturing using tuner as source (default /dev/tuner0)

# This is ONLY used for FreeBSD. Leave it commented out for Linux

; tunerdevice /dev/tuner0


# The video input to be used (default: -1)

# Should normally be set to 0 or 1 for video/TV cards, and -1 for USB cameras

input -1


# The video norm to use (only for video capture and TV tuner cards)

# Values: 0 (PAL), 1 (NTSC), 2 (SECAM), 3 (PAL NC no colour). Default: 0 (PAL)

norm 0


# The frequency to set the tuner to (kHz) (only for TV tuner cards) (default: 0)

frequency 0


# Rotate image this number of degrees. The rotation affects all saved images as

# well as movies. Valid values: 0 (default = no rotation), 90, 180 and 270.

rotate 0


# Image width (pixels). Valid range: Camera dependent, default: 352

#width 1024

width 640


# Image height (pixels). Valid range: Camera dependent, default: 288

#height 576

height 480


# Maximum number of frames to be captured per second.

# Valid range: 2-100. Default: 100 (almost no limit).

framerate 15


# Minimum time in seconds between capturing picture frames from the camera.

# Default: 0 = disabled - the capture rate is given by the camera framerate.

# This option is used when you want to capture images at a rate lower than 2 per second.

minimum_frame_time 0


# URL to use if you are using a network camera, size will be autodetected (incl http:// ftp:// mjpg:// or file:///)

# Must be a URL that returns single jpeg pictures or a raw mjpeg stream. Default: Not defined

;netcam_url http://127.0.0.1/cgi-bin/raspicam.sh


# Username and password for network camera (only if required). Default: not defined

# Syntax is user:password

; netcam_userpass value


# The setting for keep-alive of network socket, should improve performance on compatible net cameras.

# off:   The historical implementation using HTTP/1.0, closing the socket after each http request.

# force: Use HTTP/1.0 requests with keep alive header to reuse the same connection.

# on:    Use HTTP/1.1 requests that support keep alive as default.

# Default: off

netcam_keepalive off


# URL to use for a netcam proxy server, if required, e.g. "http://myproxy".

# If a port number other than 80 is needed, use "http://myproxy:1234".

# Default: not defined

; netcam_proxy value


# Set less strict jpeg checks for network cameras with a poor/buggy firmware.

# Default: off

netcam_tolerant_check off


# Let motion regulate the brightness of a video device (default: off).

# The auto_brightness feature uses the brightness option as its target value.

# If brightness is zero auto_brightness will adjust to average brightness value 128.

# Only recommended for cameras without auto brightness

auto_brightness off


# Set the initial brightness of a video device.

# If auto_brightness is enabled, this value defines the average brightness level

# which Motion will try and adjust to.

# Valid range 0-255, default 0 = disabled

brightness 0


# Set the contrast of a video device.

# Valid range 0-255, default 0 = disabled

contrast 0


# Set the saturation of a video device.

# Valid range 0-255, default 0 = disabled

saturation 0


# Set the hue of a video device (NTSC feature).

# Valid range 0-255, default 0 = disabled

hue 0


############################################################

# File "camera" support - read raw YUV data from a file

############################################################

#filecam_path /home/pi/test-cap/motion-mmal.capture


############################################################

# OpenMax/MMAL camera support for Raspberry Pi

############################################################

mmalcam_name vc.ril.camera

#mmalcam_control_params

#mmalcam_raw_capture_file /home/pi/motion-mmal.capture


# Switch this setting to "on" to use the still image mode of the Pi's camera

# instead of video. This gives a wider field of view, but requires

# a much slower frame-rate to achieve exposure stability

# (e.g. 0.25 fps or slower). You can use the minimum_frame_time

# parameter above to achieve this


mmalcam_use_still off


############################################################

# Round Robin (multiple inputs on same video device name)

############################################################


# Number of frames to capture in each roundrobin step (default: 1)

roundrobin_frames 1


# Number of frames to skip before each roundrobin step (default: 1)

roundrobin_skip 1


# Try to filter out noise generated by roundrobin (default: off)

switchfilter off


############################################################

# Motion Detection Settings:

############################################################


# Threshold for number of changed pixels in an image that

# triggers motion detection (default: 1500)

threshold 1500


# Automatically tune the threshold down if possible (default: off)

threshold_tune off


# Noise threshold for the motion detection (default: 32)

noise_level 32


# Automatically tune the noise threshold (default: on)

noise_tune on


# Despeckle motion image using (e)rode or (d)ilate or (l)abel (Default: not defined)

# Recommended value is EedDl. Any combination (and number of) of E, e, d, and D is valid.

# (l)abeling must only be used once and the 'l' must be the last letter.

# Comment out to disable

despeckle_filter EedDl


# Detect motion in predefined areas (1 - 9). Areas are numbered like that:  1 2 3

# A script (on_area_detected) is started immediately when motion is         4 5 6

# detected in one of the given areas, but only once during an event.        7 8 9

# One or more areas can be specified with this option. Take care: This option

# does NOT restrict detection to these areas! (Default: not defined)

; area_detect value


# PGM file to use as a sensitivity mask.

# Full path name to. (Default: not defined)

; mask_file value


# Dynamically create a mask file during operation (default: 0)

# Adjust speed of mask changes from 0 (off) to 10 (fast)

smart_mask_speed 0


# Ignore sudden massive light intensity changes given as a percentage of the picture

# area that changed intensity. Valid range: 0 - 100 , default: 0 = disabled

lightswitch 0


# Picture frames must contain motion at least the specified number of frames

# in a row before they are detected as true motion. At the default of 1, all

# motion is detected. Valid range: 1 to thousands, recommended 1-5

minimum_motion_frames 1


# Specifies the number of pre-captured (buffered) pictures from before motion

# was detected that will be output at motion detection.

# Recommended range: 0 to 5 (default: 0)

# Do not use large values! Large values will cause Motion to skip video frames and

# cause unsmooth movies. To smooth movies use larger values of post_capture instead.

pre_capture 2


# Number of frames to capture after motion is no longer detected (default: 0)

post_capture 2


# Event Gap is the seconds of no motion detection that triggers the end of an event.

# An event is defined as a series of motion images taken within a short timeframe.

# Recommended value is 60 seconds (Default). The value -1 is allowed and disables

# events causing all Motion to be written to one single movie file and no pre_capture.

# If set to 0, motion is running in gapless mode. Movies don't have gaps anymore. An

# event ends right after no more motion is detected and post_capture is over.

event_gap 60


# Maximum length in seconds of an mpeg movie

# When value is exceeded a new movie file is created. (Default: 0 = infinite)

# ATTENTION: when you're not using the motion build from the tutorial, it might fail with error 'Unknown config option "max_mpeg_time"'

# the use this line instead:

# max_movie_time 60

max_movie_time 60


# Always save images even if there was no motion (default: off)

emulate_motion off


############################################################

# Image File Output

############################################################


# Output 'normal' pictures when motion is detected (default: on)

# Valid values: on, off, first, best, center

# When set to 'first', only the first picture of an event is saved.

# Picture with most motion of an event is saved when set to 'best'.

# Picture with motion nearest center of picture is saved when set to 'center'.

# Can be used as preview shot for the corresponding movie.

output_pictures best


# Output pictures with only the pixels moving object (ghost images) (default: off)

output_debug_pictures off


# The quality (in percent) to be used by the jpeg compression (default: 75)

quality 75


# Type of output images

# Valid values: jpeg, ppm (default: jpeg)

picture_type jpeg


############################################################

# FFMPEG related options

# Film (movies) file output, and deinterlacing of the video input

# The options movie_filename and timelapse_filename are also used

# by the ffmpeg feature

############################################################


# Use ffmpeg to encode movies in realtime (default: off)

ffmpeg_output_movies on


# Use ffmpeg to make movies with only the pixels moving

# object (ghost images) (default: off)

ffmpeg_output_debug_movies off


# Use ffmpeg to encode a timelapse movie

# Default value 0 = off - else save frame every Nth second

ffmpeg_timelapse 0


# The file rollover mode of the timelapse video

# Valid values: hourly, daily (default), weekly-sunday, weekly-monday, monthly, manual

ffmpeg_timelapse_mode daily


# Bitrate to be used by the ffmpeg encoder (default: 400000)

# This option is ignored if ffmpeg_variable_bitrate is not 0 (disabled)

ffmpeg_bps 500000


# Enables and defines variable bitrate for the ffmpeg encoder.

# ffmpeg_bps is ignored if variable bitrate is enabled.

# Valid values: 0 (default) = fixed bitrate defined by ffmpeg_bps,

# or the range 2 - 31 where 2 means best quality and 31 is worst.

ffmpeg_variable_bitrate 5


# Codec to used by ffmpeg for the video compression.

# Timelapse mpegs are always made in mpeg1 format independent from this option.

# Supported formats are: mpeg1 (ffmpeg-0.4.8 only), mpeg4 (default), and msmpeg4.

# mpeg1 - gives you files with extension .mpg

# mpeg4 or msmpeg4 - gives you files with extension .avi

# msmpeg4 is recommended for use with Windows Media Player because

# it requires no installation of codec on the Windows client.

# swf - gives you a flash film with extension .swf

# flv - gives you a flash video with extension .flv

# ffv1 - FF video codec 1 for Lossless Encoding ( experimental )

# mov - QuickTime ( testing )

# ogg - Ogg/Theora ( testing )

#ffmpeg_video_codec msmpeg4

ffmpeg_video_codec mp4


# Use ffmpeg to deinterlace video. Necessary if you use an analog camera

# and see horizontal combing on moving objects in video or pictures.

# (default: off)

ffmpeg_deinterlace off


############################################################

# SDL Window

############################################################


# Number of motion thread to show in SDL Window (default: 0 = disabled)

#sdl_threadnr 0


############################################################

# External pipe to video encoder

# Replacement for FFMPEG builtin encoder for ffmpeg_output_movies only.

# The options movie_filename and timelapse_filename are also used

# by the ffmpeg feature

#############################################################


# Bool to enable or disable extpipe (default: off)

use_extpipe off


# External program (full path and opts) to pipe raw video to

# Generally, use '-' for STDIN...

;extpipe mencoder -demuxer rawvideo -rawvideo w=320:h=240:i420 -ovc x264 -x264encopts bframes=4:frameref=1:subq=1:scenecut=-1:nob_adapt:threads=1:keyint=1000:8x8dct:vbv_bufsize=4000:crf=24:partitions=i8x8,i4x4:vbv_maxrate=800:no-chroma-me -vf denoise3d=16:12:48:4,pp=lb -of   avi -o %f.avi - -fps %fps


############################################################

# Snapshots (Traditional Periodic Webcam File Output)

############################################################


# Make automated snapshot every N seconds (default: 0 = disabled)

snapshot_interval 0


############################################################

# Text Display

# %Y = year, %m = month, %d = date,

# %H = hour, %M = minute, %S = second, %T = HH:MM:SS,

# %v = event, %q = frame number, %t = thread (camera) number,

# %D = changed pixels, %N = noise level, \n = new line,

# %i and %J = width and height of motion area,

# %K and %L = X and Y coordinates of motion center

# %C = value defined by text_event - do not use with text_event!

# You can put quotation marks around the text to allow

# leading spaces

############################################################


# Locate and draw a box around the moving object.

# Valid values: on, off, preview (default: off)

# Set to 'preview' will only draw a box in preview_shot pictures.

locate_motion_mode off


# Set the look and style of the locate box if enabled.

# Valid values: box, redbox, cross, redcross (default: box)

# Set to 'box' will draw the traditional box.

# Set to 'redbox' will draw a red box.

# Set to 'cross' will draw a little cross to mark center.

# Set to 'redcross' will draw a little red cross to mark center.

locate_motion_style box


# Draws the timestamp using same options as C function strftime(3)

# Default: %Y-%m-%d\n%T = date in ISO format and time in 24 hour clock

# Text is placed in lower right corner

text_right %d.%m.%Y\n%T


# Draw a user defined text on the images using same options as C function strftime(3)

# Default: Not defined = no text

# Text is placed in lower left corner

; text_left CAMERA %t

text_left HofCam


# Draw the number of changed pixed on the images (default: off)

# Will normally be set to off except when you setup and adjust the motion settings

# Text is placed in upper right corner

text_changes off


# This option defines the value of the special event conversion specifier %C

# You can use any conversion specifier in this option except %C. Date and time

# values are from the timestamp of the first image in the current event.

# Default: %Y%m%d%H%M%S

# The idea is that %C can be used filenames and text_left/right for creating

# a unique identifier for each event.

text_event %Y%m%d%H%M%S


# Draw characters at twice normal size on images. (default: off)

text_double on


# Text to include in a JPEG EXIF comment

# May be any text, including conversion specifiers.

# The EXIF timestamp is included independent of this text.

;exif_text %i%J/%K%L


############################################################

# Target Directories and filenames For Images And Films

# For the options snapshot_, picture_, movie_ and timelapse_filename

# you can use conversion specifiers

# %Y = year, %m = month, %d = date,

# %H = hour, %M = minute, %S = second,

# %v = event, %q = frame number, %t = thread (camera) number,

# %D = changed pixels, %N = noise level,

# %i and %J = width and height of motion area,

# %K and %L = X and Y coordinates of motion center

# %C = value defined by text_event

# Quotation marks round string are allowed.

############################################################


# Target base directory for pictures and films

# Recommended to use absolute path. (Default: current working directory)

target_dir /home/pi


# File path for snapshots (jpeg or ppm) relative to target_dir

# Default: %v-%Y%m%d%H%M%S-snapshot

# Default value is equivalent to legacy oldlayout option

# For Motion 3.0 compatible mode choose: %Y/%m/%d/%H/%M/%S-snapshot

# File extension .jpg or .ppm is automatically added so do not include this.

# Note: A symbolic link called lastsnap.jpg created in the target_dir will always

# point to the latest snapshot, unless snapshot_filename is exactly 'lastsnap'

snapshot_filename %v-%Y%m%d%H%M%S-snapshot


# File path for motion triggered images (jpeg or ppm) relative to target_dir

# Default: %v-%Y%m%d%H%M%S-%q

# Default value is equivalent to legacy oldlayout option

# For Motion 3.0 compatible mode choose: %Y/%m/%d/%H/%M/%S-%q

# File extension .jpg or .ppm is automatically added so do not include this

# Set to 'preview' together with best-preview feature enables special naming

# convention for preview shots. See motion guide for details

picture_filename %v-%Y%m%d%H%M%S-%q


# File path for motion triggered ffmpeg films (movies) relative to target_dir

# Default: %v-%Y%m%d%H%M%S

# Default value is equivalent to legacy oldlayout option

# For Motion 3.0 compatible mode choose: %Y/%m/%d/%H%M%S

# File extension .mpg or .avi is automatically added so do not include this

# This option was previously called ffmpeg_filename

movie_filename %v-%Y%m%d%H%M%S


# File path for timelapse movies relative to target_dir

# Default: %Y%m%d-timelapse

# Default value is near equivalent to legacy oldlayout option

# For Motion 3.0 compatible mode choose: %Y/%m/%d-timelapse

# File extension .mpg is automatically added so do not include this

timelapse_filename %Y%m%d-timelapse


############################################################

# Global Network Options

############################################################

# Enable or disable IPV6 for http control and stream (default: off )

ipv6_enabled off


############################################################

# Live Stream Server

############################################################


# The mini-http server listens to this port for requests (default: 0 = disabled)

stream_port 8080


# Quality of the jpeg (in percent) images produced (default: 50)

stream_quality 50


# Output frames at 1 fps when no motion is detected and increase to the

# rate given by stream_maxrate when motion is detected (default: off)

stream_motion on


# Maximum framerate for stream streams (default: 1)

stream_maxrate 4


# Restrict stream connections to localhost only (default: on)

stream_localhost off


# Limits the number of images per connection (default: 0 = unlimited)

# Number can be defined by multiplying actual stream rate by desired number of seconds

# Actual stream rate is the smallest of the numbers framerate and stream_maxrate

stream_limit 0


# Set the authentication method (default: 0)

# 0 = disabled

# 1 = Basic authentication

# 2 = MD5 digest (the safer authentication)

stream_auth_method 0


# Authentication for the stream. Syntax username:password

# Default: not defined (Disabled)

; stream_authentication username:password


############################################################

# HTTP Based Control

############################################################


# TCP/IP port for the http server to listen on (default: 0 = disabled)

webcontrol_port 8081


# Restrict control connections to localhost only (default: on)

webcontrol_localhost off


# Output for http server, select off to choose raw text plain (default: on)

webcontrol_html_output on


# Authentication for the http based control. Syntax username:password

# Default: not defined (Disabled)

; webcontrol_authentication username:password


############################################################

# Tracking (Pan/Tilt)

#############################################################


# Type of tracker (0=none (default), 1=stepper, 2=iomojo, 3=pwc, 4=generic, 5=uvcvideo, 6=servo)

# The generic type enables the definition of motion center and motion size to

# be used with the conversion specifiers for options like on_motion_detected

track_type 0


# Enable auto tracking (default: off)

track_auto off


# Serial port of motor (default: none)

;track_port /dev/ttyS0


# Motor number for x-axis (default: 0)

;track_motorx 0


# Set motorx reverse (default: 0)

;track_motorx_reverse 0


# Motor number for y-axis (default: 0)

;track_motory 1


# Set motory reverse (default: 0)

;track_motory_reverse 0


# Maximum value on x-axis (default: 0)

;track_maxx 200


# Minimum value on x-axis (default: 0)

;track_minx 50


# Maximum value on y-axis (default: 0)

;track_maxy 200


# Minimum value on y-axis (default: 0)

;track_miny 50


# Center value on x-axis (default: 0)

;track_homex 128


# Center value on y-axis (default: 0)

;track_homey 128


# ID of an iomojo camera if used (default: 0)

track_iomojo_id 0


# Angle in degrees the camera moves per step on the X-axis

# with auto-track (default: 10)

# Currently only used with pwc type cameras

track_step_angle_x 10


[...] -
Xuggler encoding and muxing
18 décembre 2012, par HeineyBehindsI'm trying to use Xuggler (which I believe uses
ffmpegunder the hood) to do the following :- Accept a raw MPJPEG video bitstream (from a small TTL serial camera) and encode/transcode it to h.264 ; and
- Accept a raw audio bitsream (from a microphone) and encode it to AAC ; then
- Mux the two (audio and video) bitsreams together into a MPEG-TS container
I've watched/read some of their excellent tutorials, and so far here's what I've got :
// I'll worry about implementing this functionality later, but

// involves querying native device drivers.

byte[] nextMjpeg = getNextMjpegFromSerialPort();


// I'll also worry about implementing this functionality as well;

// I'm simply providing these for thoroughness.

BufferedImage mjpeg = MjpegFactory.newMjpeg(nextMjpeg);


// Specify a h.264 video stream (how?)

String h264Stream = "???";


IMediaWriter writer = ToolFactory.makeWriter(h264Stream);

writer.addVideoStream(0, 0, ICodec.ID.CODEC_ID_H264);

writer.encodeVideo(0, mjpeg);
For one, I think I'm close here, but it's still not correct ; and I've only gotten this far by reading the video code examples (not the audio - I can't find any good audio examples).
Literally, I'll be getting byte-level access to the raw video and audio feeds coming into my Xuggler implementation. But for the life of me I can't figure out how to get them into an h.264/AAC/MPEG-TS format. Thanks in advance for any help here.